
Knowledge Base
Articles In This Section
How Workato Actually Works: A Simple BreakdownWorkato Workflow Apps: A Complete OverviewHow to Build Your First Recipe in Workato Getting Started with Data Orchestration in WorkatoUnderstanding Webhooks in WorkatoWorkato FAQs: The Ultimate List of Common Workato FAQsHow to Sync your SurveyMonkey Data within Quickbase using WorkatoWhat is WorkatoUnderstanding Workato Custom Connectors How to use Workato's Logging SystemHow to use GitHub Secret Scanning for your Workato Developer API10 Key Benefits of WorkatoHow to Use Workato to Send an Email through Outlook What is Workato ONEHow to Connect Workato to RingCentralHow to Set Up HTTP Requests in Workato: Built-in and Custom What is an MCP Server and Why It Matters for your AI Foundation How to Build a Workato Center of ExcellenceHow to use Data Tables in Workato: Step-by-Step GuideHow to Set Up a Call Ended Trigger in Workato for RingCentralHow to Create a New App Connection in WorkatoGetting Started with Data Orchestration in WorkatoWhat is Workato ONEHow to Set Up HTTP Requests in Workato (Built-in and Custom)How to Manage API Clients and Client Roles in WorkatoHow to Use Workato For Handling FilesSections
How to Use Conditional Actions in Your Workato Recipe
In Workato, using a conditional action(s) in your recipe simply means adding logic that lets your automation behave differently depending on certain conditions—basically if this, then do that.
What it is a Conditional Action in Workato
A conditional action checks data during a recipe run and decides what steps to take next. It’s similar to an IF / ELSE statement in programming.
How does a Conditional Action Work
You define a condition (based on data from triggers or previous steps), and Workato will:
- Run specific actions if the condition is true
- Optionally run different actions if it’s false
Examples of a Conditional Action
Imagine a recipe that processes new Salesforce leads:
- IF Lead Source = “Website”
→ Add to marketing email list - ELSE IF Lead Source = “Referral”
→ Assign to sales rep - ELSE
→ Log for review
Common Uses Cases for Conditional Logic
- Routing data (e.g., assign tickets based on priority)
- Filtering records (only process certain items)
- Handling exceptions (e.g., missing fields, errors)
- Personalizing workflows (different actions per customer type)
In Workato UI, you typically use:
- “If condition” block (basic branching)
- “Conditional statements” inside steps
- Sometimes combined with loops or variables for more complex logic
Why does Conditional Logic Matter in Workato
Without conditional actions, every Workato recipe would run the same way every time. With them, your automation becomes:
- Smarter
- More flexible
- Closer to real business logic
How to Use Conditional Actions in Your Workato Recipe
We’ll start by creating this recipe just like we did with our last Workato recipe.
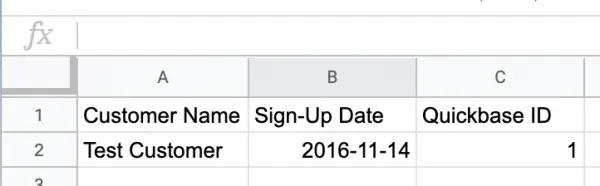
Step 1: In your Google account, create a new Google Sheets and add three columns; ‘Customer Name’, ‘Sign-up Date’ and ‘Quickbase ID’.
- Name your new sheet ‘Customers (Example)’
Step 2: Sign in to your Workato account
Step 3: Make sure you are on the ‘Recipes’ tab. Click the green button labeled ‘Create a new recipe’.
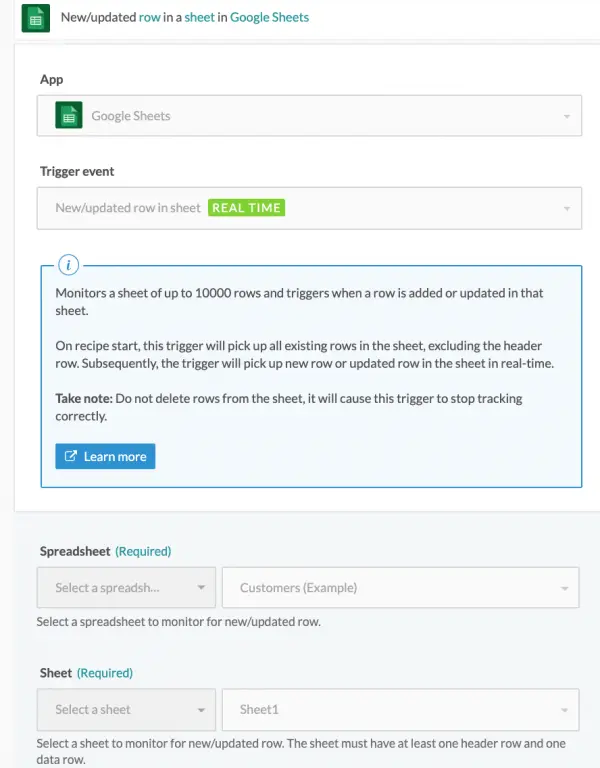
Step 4: Select your application (for this example, you will select Google Sheets) and your trigger (new/update row in sheet).
- The result should look like this:
Step 5: Click ‘Next’
Step 6: Now, choose a Google Sheets connection.
- If you need help creating a new connection, visit our Workato Knowledge Base for additional How-To Workato articles.

Step 7: Once you select your ‘Connection.'
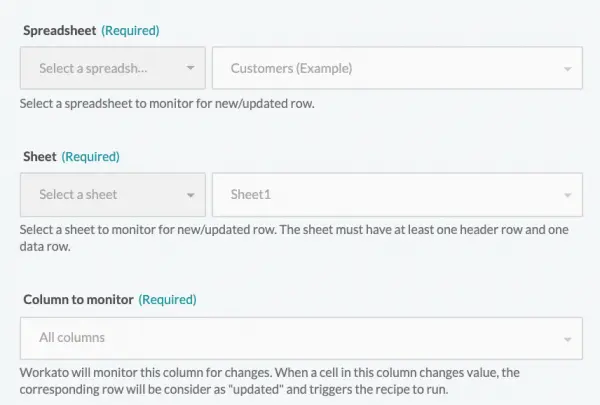
- You’ll be prompted to select a spreadsheet from your Google Sheets account as well as the sheet/tab in your spreadsheet you wish to use.
Step 8: Click ‘Next’
Step 9: Now we’ll set up our Action.
- We’re going to have two actions; ‘Update Record’ and ‘Create Record’. We’ll create our ‘Update Record’ action first
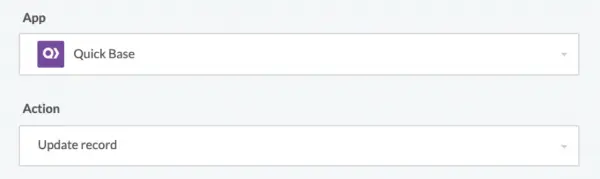
Step 10: Select your connection for Quickbase.
- If you do not have an existing connection with your Quickbase database, you will have to create a new one.
- For instruction on how to establish a connection to your Quickbase database, please visit: How to Create a New App Connection in Workato
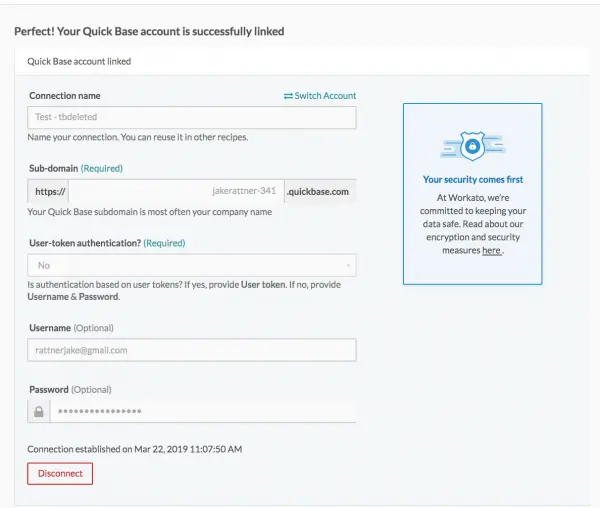
Step 11: Enter your Quickbase subdomain: https://yourdomain.quickbase.com
- Then enter the requested credentials but with your application’s information substituted (as pictured below).
Step 12: Once completed click ‘Next’
Step 13: Now select the Quickbase application you’d like to send your data to
Step 14: Designate a source for the Quickbase Record ID.
- This is how Workato will identify which record is updated in Quickbase when a change/update is made to that row in Google Sheets:

Step 15: Select the fields to be updated in the ‘Table field list’ and select the corresponding fields in Google Sheets for each field.
- Your recipe action should now look like this:
Step 16: Once completed, click ‘Finish’.
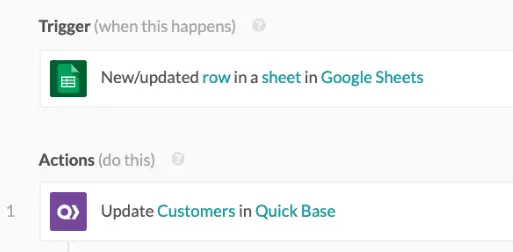
- We’re not actually finished though - We’re going to edit our recipe and add an action to and logic to determine whether a record should be updated or added.
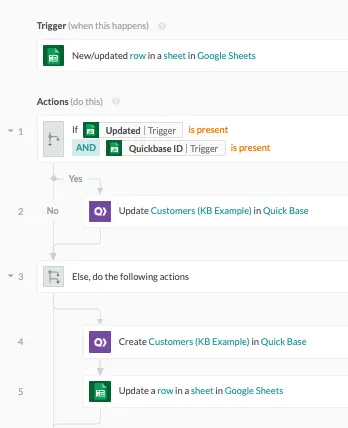
- At the moment, your recipe should look like this (example below)
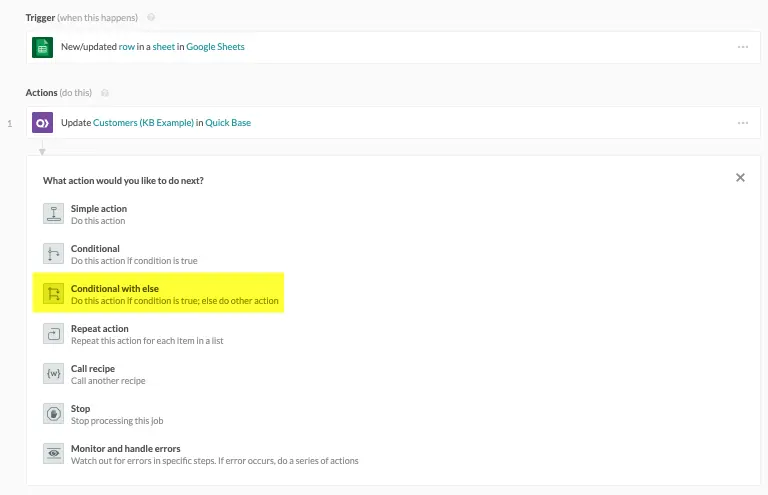
Step 17: Our next step will be to add a conditional action.
- To do so, click the plus sign (+) below the ‘Update Customers in Quickbase’ action and select ‘Conditional with Else’:
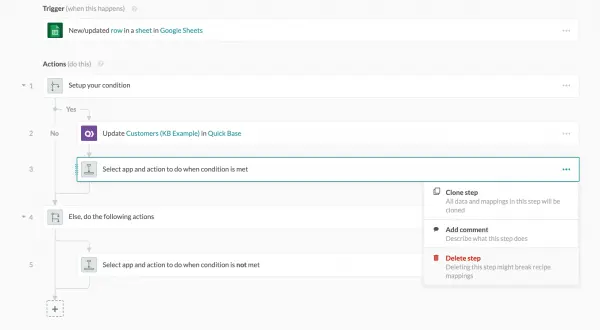
Step 18: Now, drag our ‘Update Customers' (KB Example) in Quickbase to the location of the black arrow below:

Step 19: By dragging your action into the conditional action area you’ve now got two actions. Delete the extra action:
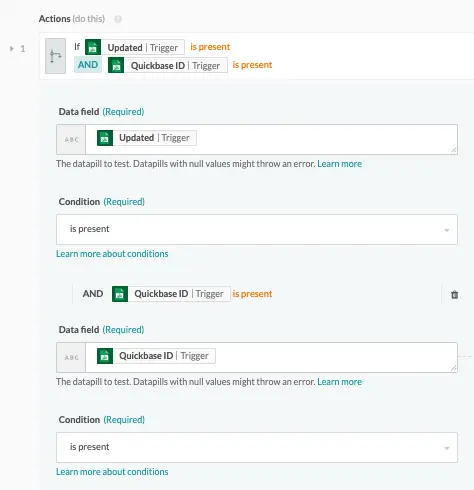
Step 20: Now we’ll set up our condition by clicking, ‘Setup your condition’, just below our trigger. Here we’ll add two conditions
- First, ‘Updated’ to indicate the row has been updated.
- Second, that data ‘is present’ in the ‘Quickbase ID’ column of our Google Sheet.
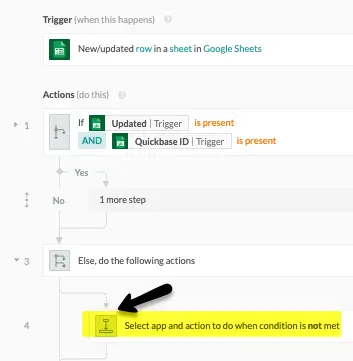
Step 21: At the moment our new conditional action say that if a Google Sheet row is updated, update the corresponding record in Quickbase, if not (else) do something.
- Now we need to define what that something is. To do so, click into the field labeled ‘Select app and action….’ highlighted below:
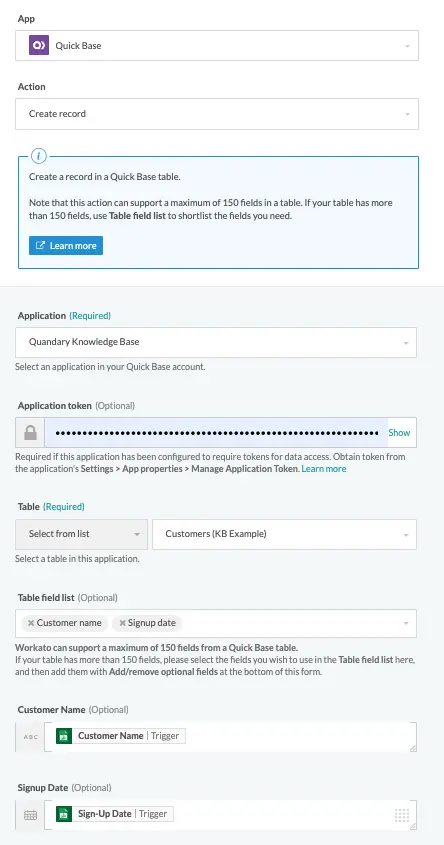
Step 22: Now we’ll set up a ‘Create Record’ action which is virtually identical to our previous ‘update record’ action.
- When completed, your setup should look just like this. (Update the application and table name with your own):
Step 23: Now for the last step in the recipe.
- Remember when we created our ‘update record’ action and we added the record ID from Google Sheets?
- Now we need to create an action which, when a new record is added to Quickbase, writes the record ID of the created Quickbase record back to the Google sheet row.
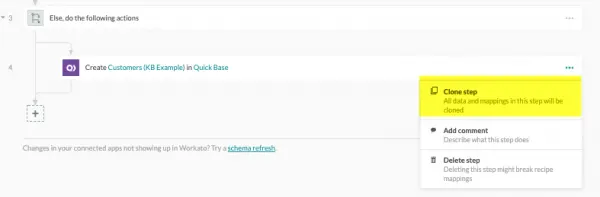
Step 24: Let’s start by cloning our ‘Create Customers….’ action:
- Now we’ll change the action we just cloned to the following:
- Let’s take a moment to look at our recipe and recall what we’ve just done:
Step 26: We created our trigger for when a row is ‘New/Updated’
Step 27: We added a condition to determine if the row is ‘updated’ and a ‘Quickbase ID is present’
- If ‘Yes’, ‘Update Customer Table Record’
- If ‘No’ create a new Quickbase record in our table, then update our spreadsheet row with the record ID of the newly created Quickbase record.
Step 28: All that’s left now is to save and test our recipe.
- Make sure to check what happens when you add a new row as well as when you edit an existing row.
Top FAQs: Conditional Logic in Workato Recipes
1. What is conditional logic in Workato?
Conditional logic in Workato allows a recipe to take different actions based on data conditions using “If/Else” statements.
It enables dynamic automation where workflows adapt in real time instead of following a fixed path.
2. How do you use an “If condition” in a Workato recipe?
To use an If condition in Workato:
- Add an “If condition” step
- Define your condition using data pills (e.g., status, value, text)
- Add actions under:
- If (true)
- Else (false)
You can also add Else If branches for multiple conditions.
3. What are common use cases for conditional logic in Workato?
Popular Workato conditional logic use cases include:
- Lead routing (assign based on region or source)
- Ticket prioritization (high vs low urgency)
- Data validation (check for missing fields)
- Workflow branching (different actions per customer type)
- Error handling and fallback logic
4. What is the difference between If/Else and filters in Workato?
- If/Else conditions → Control branching within a recipe
- Filters → Control whether a step runs at all
Instead, use this:
- Filters to skip steps
- If conditions to create multiple execution paths
5. Can you use multiple conditions in Workato?
Yes, Workato supports multiple conditions using AND/OR logic.
Example:
- IF Status = “Open” AND Priority = “High”
- IF Region = “US” OR Region = “Canada”
This allows precise control over workflow behavior.
6. How do you handle complex logic in Workato recipes?
For complex conditional logic, you can:
- Use nested If statements
- Combine AND/OR conditions
- Leverage lookup tables
- Use formula mode for advanced expressions
Best practice: keep logic readable and avoid excessive nesting.
7. What is formula mode in Workato conditions?
Formula mode lets you write custom expressions using Ruby-based syntax.
Example:
input['amount'] > 1000 && input['country'] == 'US'
It’s useful for:
- Advanced comparisons
- String manipulation
- Mathematical logic
8. How do you debug conditional logic in Workato?
To troubleshoot:
- Use Job History to inspect runs
- Check input/output data pills
- Add temporary logging steps
- Test conditions with sample data
This helps identify why a condition evaluated as true or false.
9. What are best practices for conditional logic in Workato?
Workato conditional logic best practices:
- Keep conditions simple and readable
- Use clear naming for variables
- Avoid deep nesting
- Test edge cases
- Document complex logic inside recipes
10. Can conditional logic impact Workato performance?
Yes—overly complex conditions or excessive branching can:
- Slow down execution
- Make recipes harder to maintain
Optimizing logic improves both performance and reliability.
11. When should you use lookup tables instead of conditions?
Use lookup tables when:
- You have many mapping rules
- Logic changes frequently
- Non-technical users need to update logic
This reduces hardcoding inside conditions.
12. What are common mistakes with Workato conditional logic?
Common errors include:
- Incorrect data type comparisons (string vs number)
- Missing null checks
- Overusing nested conditions
- Not testing all branches
- Hardcoding values instead of using variables
13. Can you reuse conditional logic across recipes?
Not directly, but you can:
- Use callable recipes
- Centralize logic in lookup tables
- Store logic in variables or formulas
This improves scalability and consistency.
14. How do conditional actions improve automation?
Conditional logic makes recipes:
- More flexible
- More intelligent
- Closer to real business rules
It allows one recipe to handle multiple scenarios instead of creating many separate workflows.
- Author: John Orsak
- Title: Senior Solution Delivery Consultant | Workato
- Email: jorsak@quandarycg.com
- Date updated: 04/01/2026

Industries
Resources


© 2026 Quandary Consulting Group. All Rights Reserved.
Privacy Policy