
Knowledge Base
Articles In This Section
User Groups | BEGINNERHow to Share with Everyone on the Internet How to Archive Records Using Role Permissions | INTERMEDIATEHow to Use and Adjust Roles in Quickbase | BeginnerHow to Switch a Client to a New Quickbase Developer How to Display Information for Certain Roles in QuickbaseConditional Filters for Record Permissions Using Roles | INTERMEDIATEHow to Add New Users to your Quickbase ApplicationDenying User Access | BEGINNERSections
Adding a new User Role in Quickbase
Roles allow us to differentiate users performing specific jobs within an application. They can be used to assign various levels of access to tables and fields, show and hide particular data and influence users’ workflow across the application. The successful implementation of roles will create an efficient workspace for all users.
Creating a New User Role
Once you have appropriate permissions, you can visit the Roles main page by navigating to the Users table and clicking Manage Roles. You can also get there from your application home page by visiting Settings > Roles.
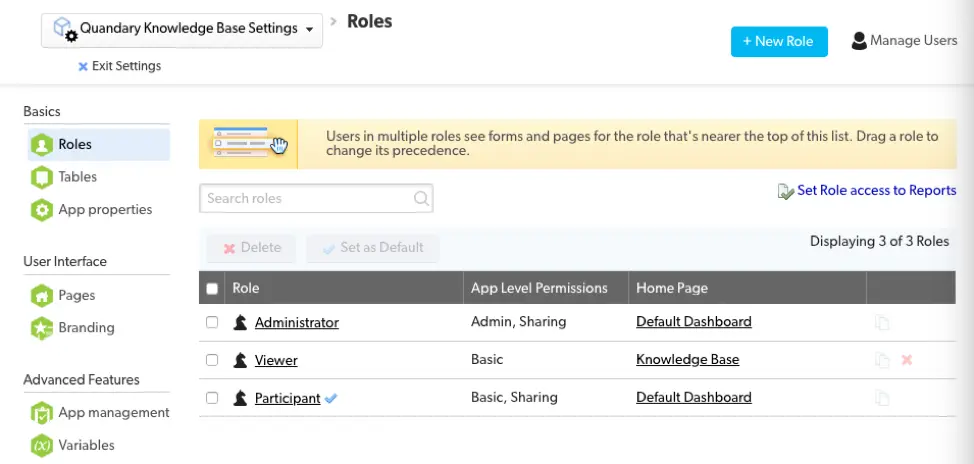
2. To add a new Role, click the + New Role button to the top right of the screen. After doing so, you will be prompted to provide a Role Name and optional Description for the new role you are creating. Click OK to save.
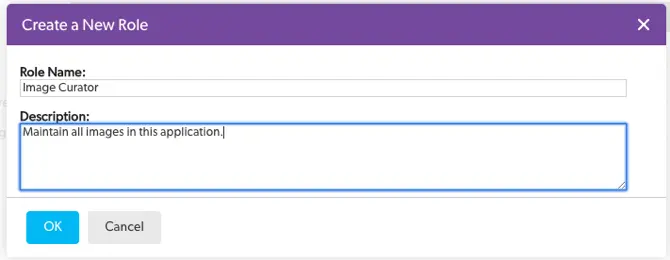
3. Once the role has saved, you will be directed back to the Roles homepage where you will see your new role added to the list of existing ones. The App Level Permissions will be Basic and the Home Page will be set to the Default Dashboard. You can update the name and description any time from the Properties tab.
Setting Role Permissions
Now that you’ve added a new role, you will want to define what Users in this role will be allowed to do in your application. To get started, click the Name of your new role to enter the detailed view.

Under the App Access section, there are three checkbox options you can adjust for the new role, based on which ones you select, the role will be given one of the following permission levels:
- None: Select Disable access to app for users with this role. This will prevent any users in this role from accessing your app. This is useful if you want to turn off access for certain users in one app, while allowing access to other apps in your realm.
- Basic: Do not select any checkboxes. This is the default role that should be chosen for users who need access to the app, but do not need any administrative controls. Users in this role will not be able to customize the app or manage users.
- Basic, Sharing: Select the Manage users and share the app. In addition to the Basic permissions above, users will be able to manage ALL users in the application. Although these users can share the application with others, Quick Base prevents them from granting or revoking Full Administration access for any user.
- Admin: Select Edit app structure and permissions. This grants Full Administration access WITHOUT the ability to manage users. This role is best for application builders who do not necessarily need to share the app or monitor who is in the app.
- Admin, Sharing: Select both Manage users and share the app and Edit app structure and permissions. This grants Full Administration rights to the user for app customization and sharing.
Configuring Table Access

Under the Table Access section, you can define specific permission levels for each table for viewing, adding, modifying and deleting records. The Add and Delete checkboxes are used to specify whether the user can add/delete records in the table. View and Modify allow for significantly more customization options:
- None: Grants no access to the table.
- All Records: Grants view/modify rights to any record in the table.
- Group’s Records: Grants view/modify rights to only records created by users in the same group.
- Custom Rule: Allows you to specify parameters for view/modify access. After selecting this option, click the Edit icon to configure the criteria for access in a new popup window.
Select the Save Common Reports checkbox if you want to allow users to save reports visible to all other users of you app. The Edit Fields Properties checkbox will allow users to edit field properties within the specified table. Use the Fields dropdown to control access to table fields. You initially select either Full Access, No Access or Custom Access. Selecting Custom Access will allow you to configure permissions for individual fields.
User Interface
The User Interface tab allows you to control what users will see when they access the application by showing and hiding selected elements.
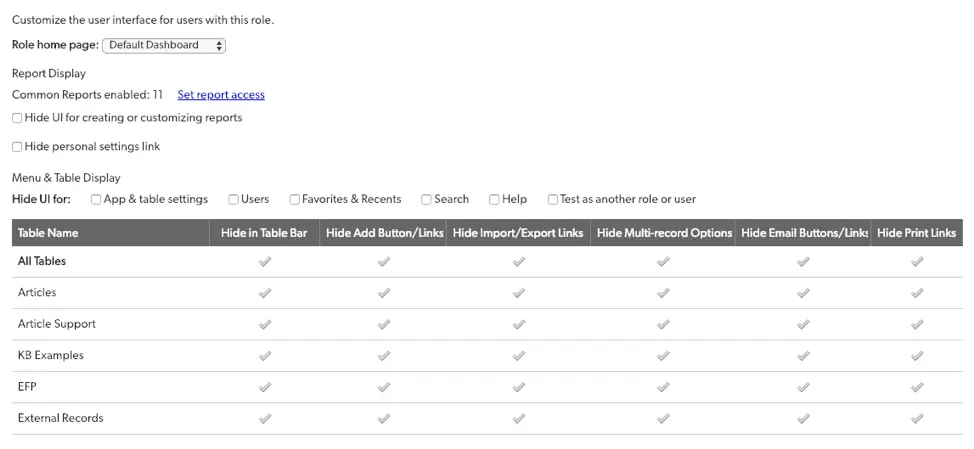
- Use the Role home page: dropdown to select which page the user sees when they visit Home.
- Click the Set report access link to customize which reports the user can see. By default they will have access to List All and List Changes.
- Use the Hiding UI for creating or customizing reports checkbox to toggle the users ability to create or change reports. Be sure to unselect the Save Common Reports checkbox in the Permissions tab, otherwise the user will be able to create common reports but never edit them.
- Select the Hide personal settings link checkbox to prevent the user from accessing settings through their dropdown at the top right of the navigation.
- You may also hide UI for the following: App & table settings, Users, Favorites & Recents, Search, Help and Test as anther role or user.
- Use the checkbox columns to control access to which tables appear in the Table Bar, hide Add Buttons, Import/Export Links, Multi-record Options, Email Buttons/Links and Print Links.
Adding new Roles is a crucial component to building customized workflows to your Quick Base application. Once you’ve created a Role, you’ll probably want to give it a unique dashboard. For more on that, check out Chayce’s article on Creating a new Dashboard.
- Author: QCG Development Team
- Email: dev@quandarycg.com
- Date Submitted: 1/2/2019

Resources


© 2026 Quandary Consulting Group. All Rights Reserved.
Privacy Policy