
Knowledge Base
Articles In This Section
User Groups | BEGINNERAdding a new User Role in QuickbaseHow to Share with Everyone on the Internet How to Archive Records Using Role Permissions | INTERMEDIATEHow to Switch a Client to a New Quickbase Developer How to Display Information for Certain Roles in QuickbaseConditional Filters for Record Permissions Using Roles | INTERMEDIATEHow to Add New Users to your Quickbase ApplicationDenying User Access | BEGINNERSections
How to Use and Adjust Roles in Quickbase | Beginner
A Quickbase application can have a variety of users who need different levels of access. Effective use of these permissions doesn’t just ensure everybody sees the right information. It’s also critical to the security and privacy of applications.
In this article, we’ll show you how to set up a role, create and edit custom access rules, and manage access permission for a role in Quickbase.
What Is a Quickbase Role?
Quickbase roles allow you to control numerous aspects of an application. The most common use of roles is to limit the records a user can view and modify based on table-level rules. Each role has rules for access to each table and the records in it.
Default Quickbase Roles
Quickbase applications include three default roles:
- Administrator: The Administrator role is granted to the application owner by default. Users in this role have access to the application settings. Administrators typically have wide-ranging responsibilities within the application, including development, governance, compliance, and oversight roles.
- Viewer: The Viewer role has the ability to look at tables, records, and associated reports but cannot add or modify records.
- Participant: The Participant role has the same permission as the Viewer role and can add and modify records in the database.
Custom Roles can also be created and tailored to meet the more granular access and security requirements of applications.
The Importance of Roles in a Quickbase Application
You will use Quickbase roles each time you give access to a new user. These roles limit access to sensitive information, improve the user experience, and govern the behavior of users. It is just as important to think about what you are enabling the user to do as what you are restricting when designing user roles.
Custom roles are often designed to only allow users to view the records they create or that have been assigned to them.
The following examples are provided to illustrate the importance of effective role design and management.
- In an HR application that automates the hiring and credentialing of employees, the product owner does not want everyone accessing the application to see sensitive data like salaries or performance reviews. Custom User roles are designed to prevent unauthorized access.
- In a project management application, you may improve the user experience and reduce errors, by restricting the roles to view and modify only the projects they are assigned.
- In a healthcare application, you want to limit the visibility of entire elements of the application. For example, you allow only licensed medical professionals to have access to PHI in compliance with defined HIPAA policies.
- You may want to limit access to a specific table or group of records, for example, an archive of legacy records subject to a data retention policy.
The decision of which user gets which role should be discussed with the product owner, and determined before the application goes live.
Roles UI Overview for Administrators.

Roles are listed in order of precedence. Users in multiple roles have access to the role nearest the top of the list.
Participant is the default application role unless another role has been designated. The blue checkmark to the right of the role name signifies the default role.
The default role can be changed by application administrators. To change the default role, you need to toggle the checkbox to the right of the role, and click the Set as Default button. (Note: the Set as Default button is hidden unless a change is pending)
An existing role can be copied to use as a starting point for a new role by clicking the copy icon located in the last column of the role record.
Add a new role from scratch by clicking the New Role button in the upper right corner of the UI above the role list.
To modify an existing role, click the role name to open the configuration UI for the role.
Modify Role Permissions and UI Access
The UI for managing roles consists of 3 pages utilizing tab navigation to organize the settings.
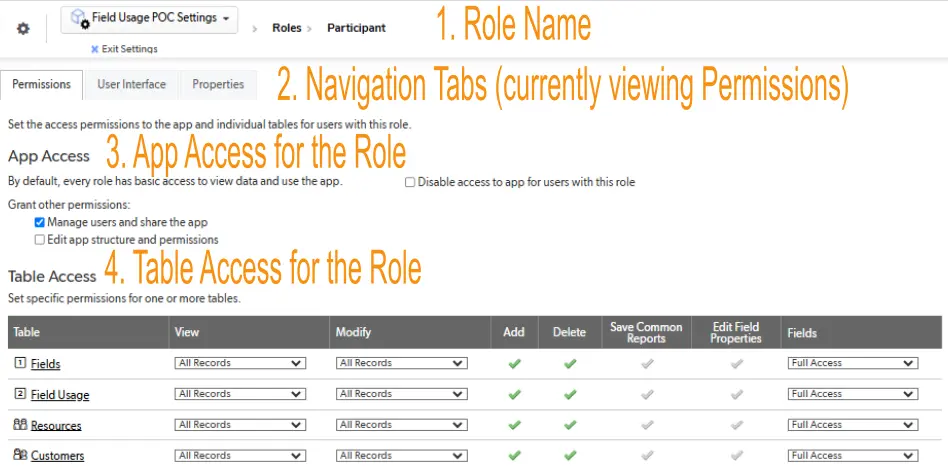
Permissions Tab
You can set up the permissions to the app and individual tables for users in the selected role here. The screenshot below shows the Participant role. The key elements of the tab are as follows:
- Role Name (Edit on the Properties tab)
- Navigation Tabs
- App Access settings
- Table Access settings
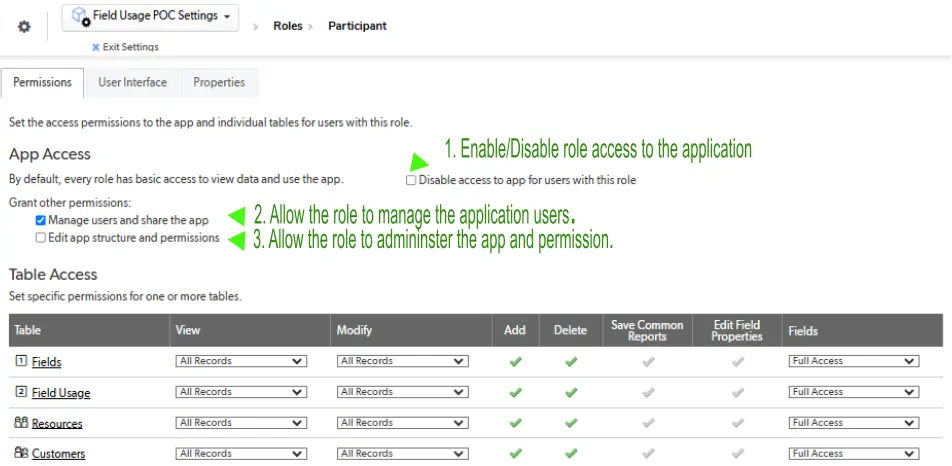
The App Access settings determine the role’s permission to:
- Log in to the application: In the example screenshot below, the Participant role has access to the application. (Unchecked by default. Enable the checkbox to deny access)
- Manage users and share the application: In the example screenshot below, the Participant role has permission to manage the users of the application. (Enabled by default for the Participant and Administrator roles)
- Change the application’s structure and permission: DOES NOT have permission to change the application structure (build) or permissions. (The checkbox IS NOT enabled by default for the Viewer and Participant roles)
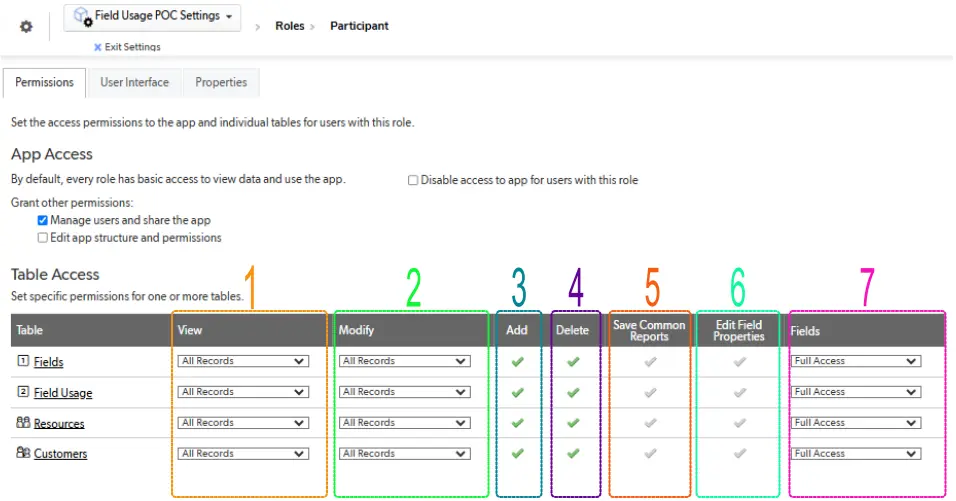
The Table Access settings control table specific permission for the role. The UI is arranged in a matrix format. Each row of the matrix relates to the name of a table in the application. Settings in the row determine how the role interacts with the records, reports, and information in it.
In the example screenshot below, these are the table access permission settings of someone in the Participant role:
- View Records: has permission to view all records in all tables in the app.
- Modify Records: has permission to modify all records in all tables in the app.
- Add Records: has permission to add records to all tables in the app.
- Delete Records: has permission to delete records from all tables in the app.
- Save Common Reports: does not have permission to save common reports in any of the app tables. (All users can create reports for personal use.)
- Edit Field Properties: does not have permission to edit field properties in any of the app tables.
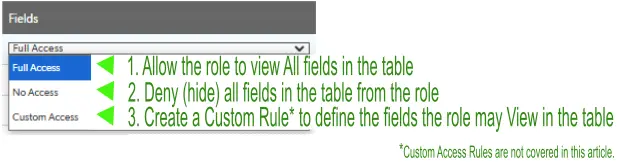
- Fields: has full access to all fields in all tables in the app.
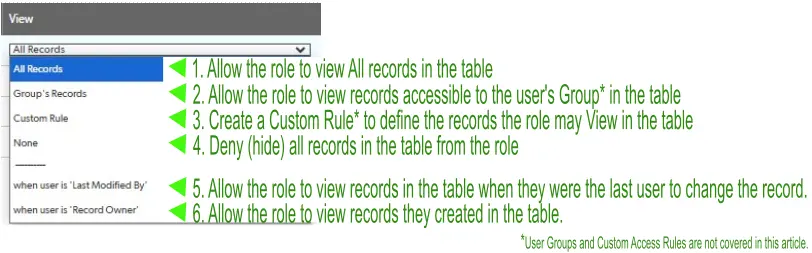
The View, Modify, and Fields settings utilize multiple choice “drop-down” style UI controls. The View and Modify settings offer the choices as illustrated in the following screenshot.
The Fields setting offers the choices illustrated in the following screenshot.
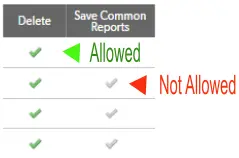
The Add, Delete, Save Common Reports and Edit Field Properties checkboxes are toggled on/off with a single mouse click. The following illustration shows a detailed view of an enabled and disabled checkbox.
- When the option is enabled (Allowed) for the table, the checkbox is colored green.
- When the option is disabled (Not Allowed) for the table, the checkbox is “grayed out.”
User Interface Tab
The settings and controls on the User Interface tab allow the UI to be customized to fit the needs of users in the selected role. This tab is densely populated with controls that can be easily overlooked.
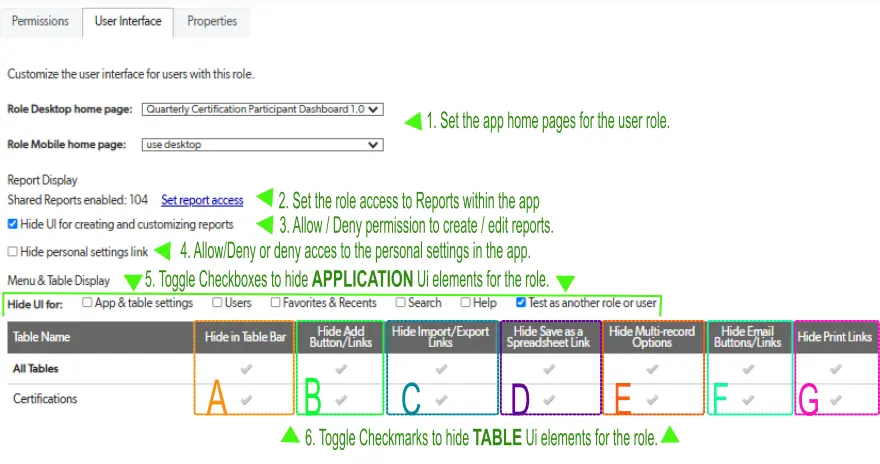
The example screenshot on the next page continues following the Participant role. It is labeled to show the location of each of the controls listed below:
- The application homepage users in the role will see when logging in is set using the two dropdown fields on this tab. The home pages you have created inside of the current application will be available in each select list. In the example screenshot below, the role is using default settings.
a. Desktop home page: for users that sign in from a desktop, laptop, notebook, etc.
b. Mobile home page: for users that sign in with a mobile device.
- Report Display settings include the number of reports the role has access to and a link to the admin UI for managing report access.
- Allow users to create and customize reports in the application.
- Allow users to manage personal reports, notifications, and other customized views within the application; essentially, controlling what data you see and how you interact with it on a personal level.
- Menu and Table Display settings hide application UI elements. Hiding in this context means denying the permission to use it. The application-level elements that can be hidden are:
- App and Table settings
- Users
- Favorites & Recents
- Search
- Help
- Text as Another Role
- Menu and Table Display settings hide table UI elements, such as:
- Table Bar
- Add Button/Links
- Import/Export Links
- Save as a Spreadsheet Link
- Multi-Record Options
- Email Button/Links
- Print Links
In the example screenshot below, the Participant role is using a custom home page for desktop and mobile devices. It has access to 104 reports but cannot customize them or create new ones. Access to personal links is allowed. Within the UI, the role may not Test as another role or user. The role has full access to the table-level settings.
Properties Tab
The properties tab is where the role name and description can be set and modified. When using the default roles it isn’t necessary to enter a description. But when creating custom roles you should always describe why the role exists in terms of what it can do that other roles cannot.
Tips for Using Roles in Quickbase
It is important to remember that you must assign the most suitable role for each user, giving them the most appropriate level of control and not more.
When creating a new role, keep the necessary requirements for that role in mind and make sure you are not allowing users to have access to sensitive data that they should not see.
Finally, you can associate a custom form with roles, providing different add, view, and edit forms for each role, or a different form per role for users accessing your application.
- Author: Jeff Richey
- Date Submitted: 2025-03-07T01:43:54Z

Resources


© 2026 Quandary Consulting Group. All Rights Reserved.
Privacy Policy