
Knowledge Base
Articles In This Section
How to Use Application Variables (Global Params) in Quickbase How to Create and Add a File Download Button in Quickbase How to Set Up Conditional Drop-downs in Quickbase How to Add Material Lists to a Project Record in QuickbaseUsing a Formula-URL Field in Quickbase - INTERMEDIATEUsing Report Formulas as a Filter in a Report in QuickbaseSections
Quickbase Tables vs Fields: Key Differences, Examples, and Best Practices
In Quickbase, Tables and fields serve as the foundational building blocks of a Quickbase database. Tables organize data in a structured row-and-column format, akin to a spreadsheet, while relationships link tables to establish meaningful connections between data sets. Together, these components enable efficient organization and management of related information, ensuring it is both accessible and actionable.
A clear understanding of these two key Quickbase fundamentals is essential for building a robust Quickbase application that effectively supports your organization’s operational and analytical needs.
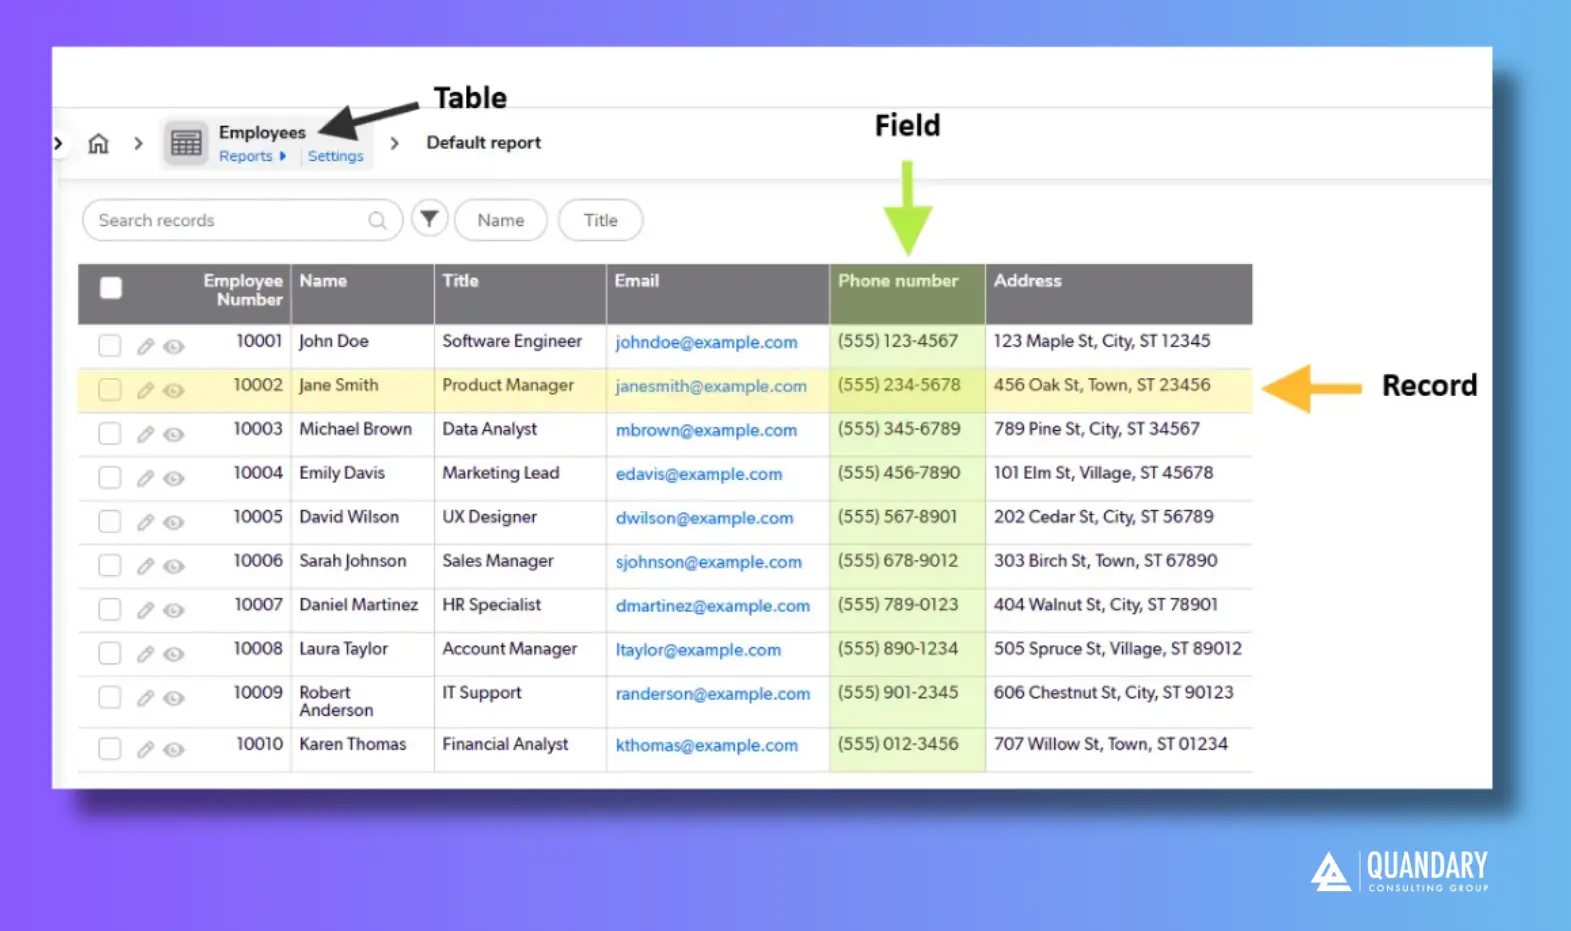
What are Tables in Quickbase (the “what”)
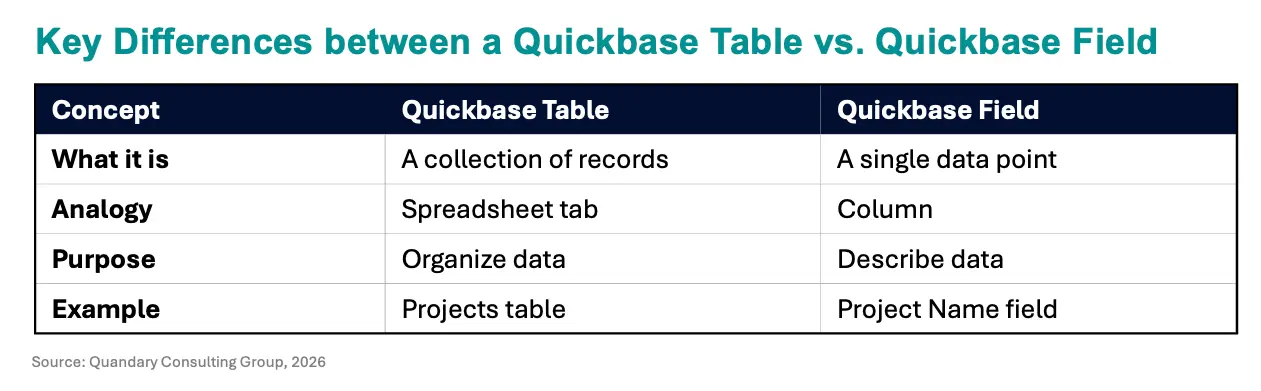
A table is where a collection of related records lives—think of it like a spreadsheet tab or a database table.
Simple analogy:
- Table = Spreadsheet tab
- Each row = a record (one item)
- Each column = a field (data point about that item)
So, If you’re tracking projects, you might have a table called: Projects Table
- Each record = one project
- Contains all project-related data
You can have multiple tables in one app, such as:
- Projects
- Tasks
- Employees
- Clients
Key characteristics of tables:
- Store records (rows of data)
- Define the structure of your data
- Can be connected to other tables (relationships)
Why Use Tables in Quickbase
Using tables allows you to separate different types of data so your database stays organized.
For example, you can create an “Employees” table to store basic employee information and a “Payroll” table to track monthly payroll. Instead of creating a new table for each employee, you would add each individual employee as a separate record in the “Employees” table.
Grouping data in this way makes it easy to manage.
What is a Quickbase Table-to-Table Relationships
Using database tables and relationships improves efficiency by allowing you to enter data once and reuse it multiple times throughout your app.
In Quickbase, this is known as a table-to-table relationship.
For example: You can create a relationship between the “Employees” and “Payroll” tables, where one employee can have multiple monthly payroll records (a one-to-many relationship).
This relationship will allow you to link a payroll record to the appropriate employee so you can create a new payroll record without having to re-enter the employee’s information each time.
How to Create a Table from Scratch in Quickbase
Before you start, here are three quick tips to keep in the back of your mind while you build:
- If you find yourself entering the same type of data repeatedly, consider creating a table.
- Keep table names short and consistent for easy reference.
- Add a description in the table settings to help provide insight into each table’s purpose and usage.
Using Quickbase’s new navigation, you can create a table in one of two ways
- Option 1: Using the Visual Builder
- Option 2: Using the New Table Feature=
Option 1: How to Create a Table from Scratch In Quickbase Using Quickbase Visual Builder
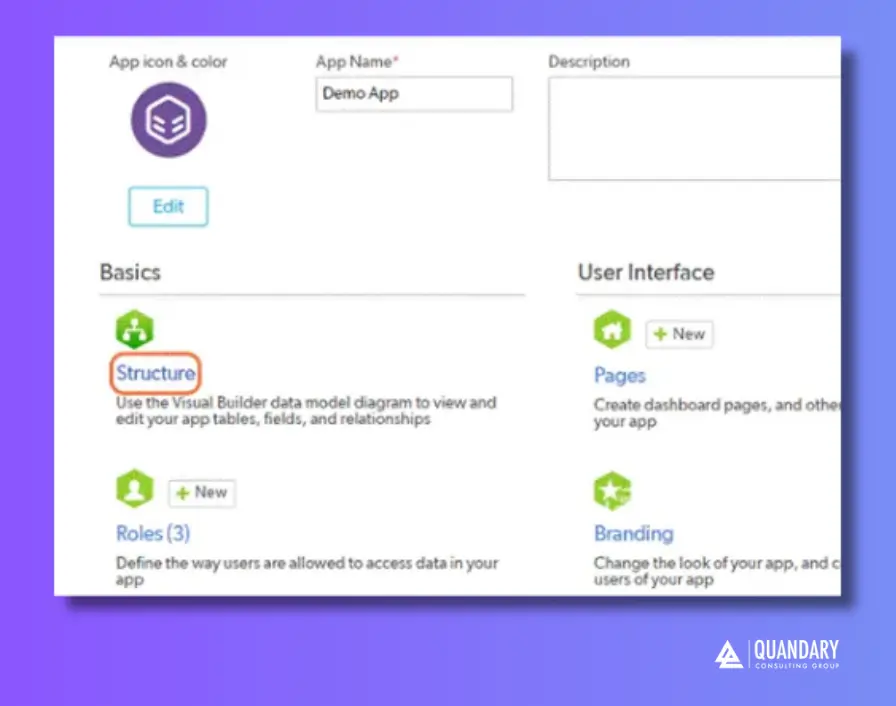
Step 1: From the My Apps page, open the app to which you want to add a table.
Step 2: Click App Settings in the sidebar or from the App Home page
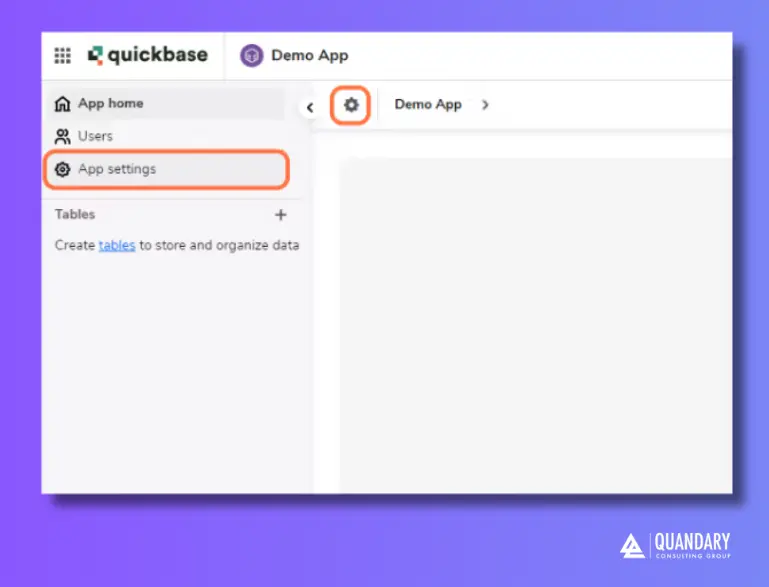
Step 3: Click on Structure to open the Visual Builder

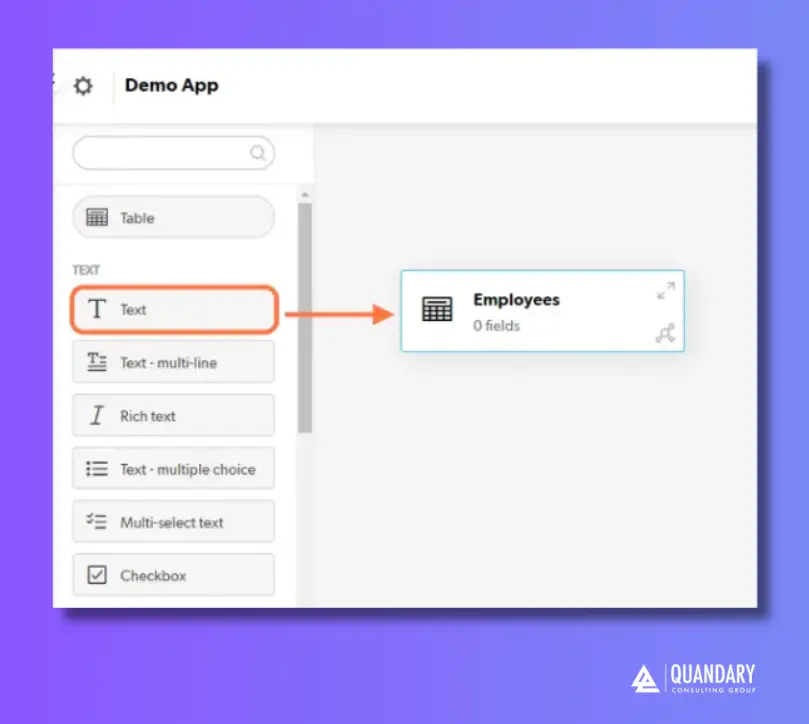
Step 4: From the left column, drag and drop the table element onto the canvas to add a new table.
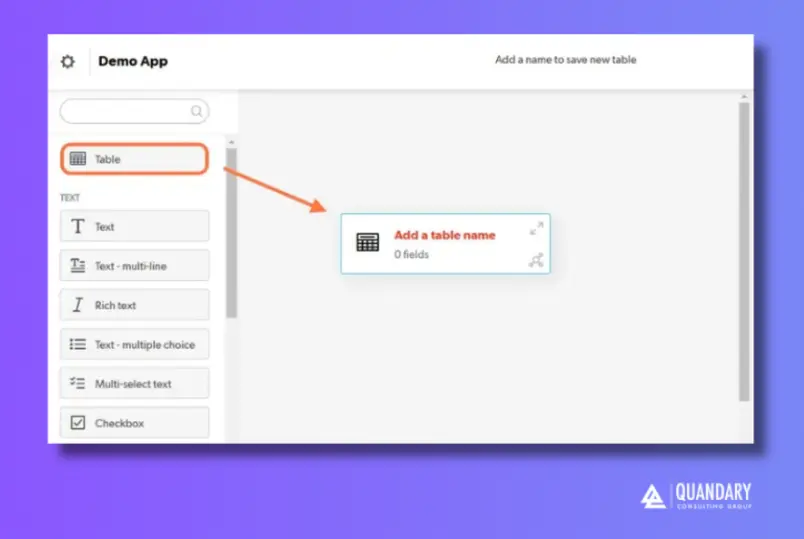
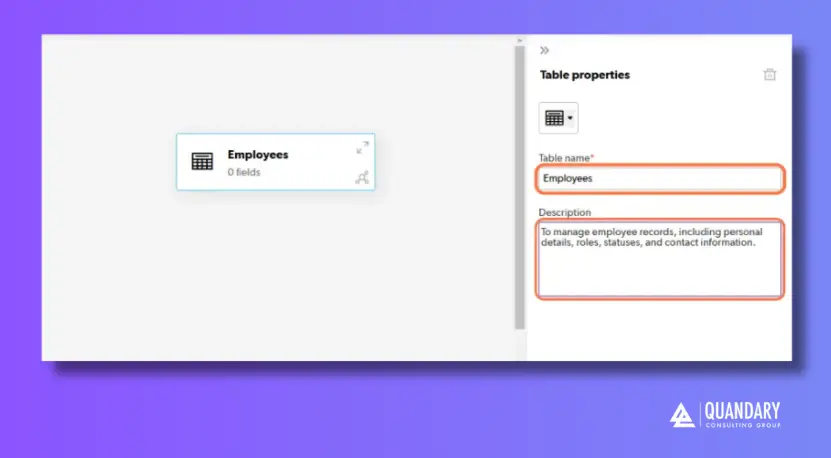
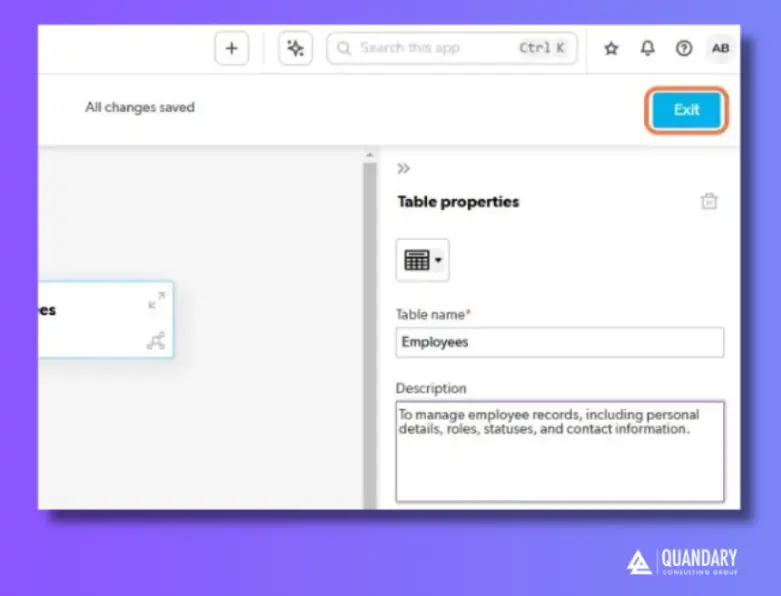
Step 5: Enter the Table Name and Description (optional).
Step 6: Click Exit when you are finished
- All changes are always saved automatically in Quickbase
Option 2: How to Create a Table from Scratch in Quickbase Using the New Table Feature=
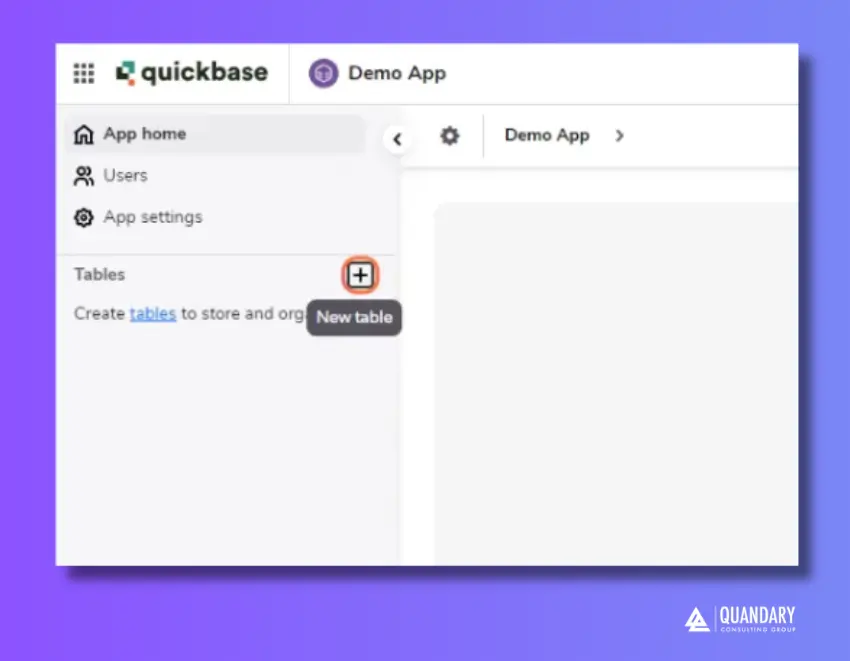
Step 1: From the My Apps page, open the app to which you want to add a table.
Step 2: Click the + button in the Tables section on the sidebar to add a new table.
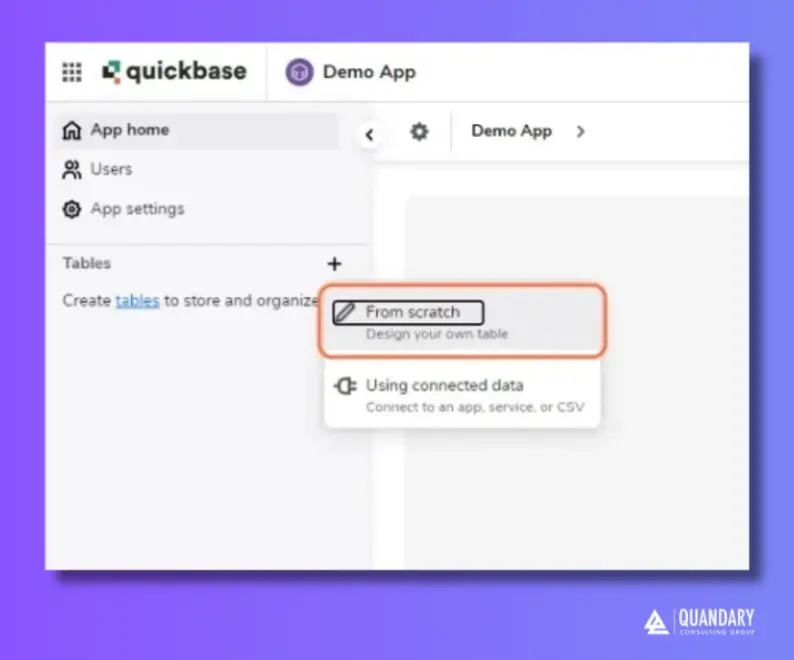
Step 3: Click the From scratch button
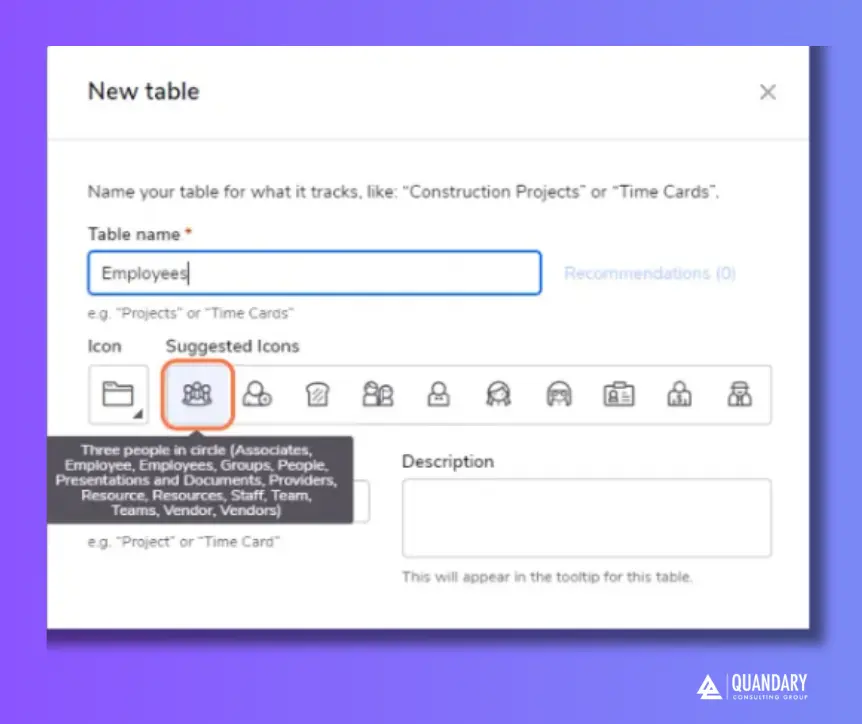
Step 4: Enter the Table name
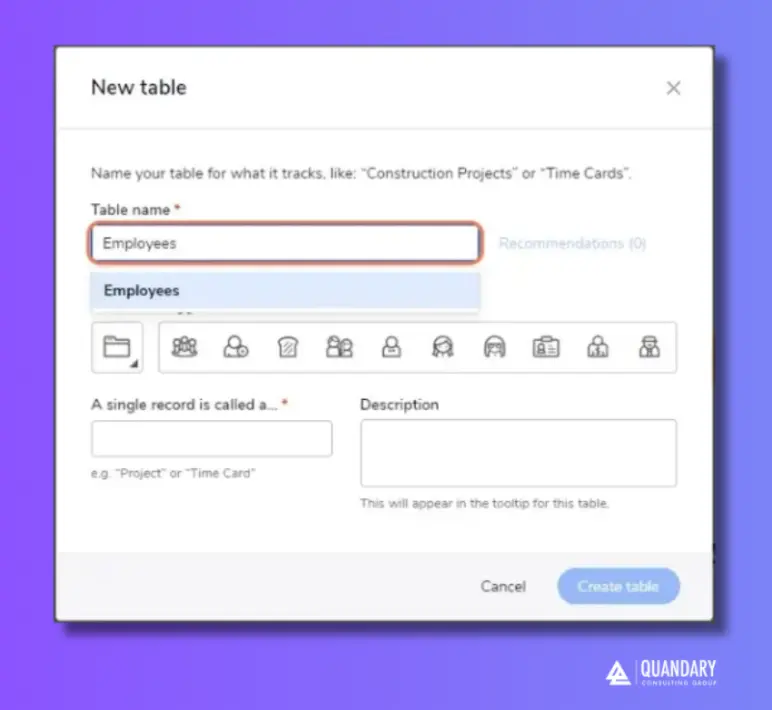
Step 5: Select an icon that best represents your table
- Quickbase will suggest icons based on the Table name
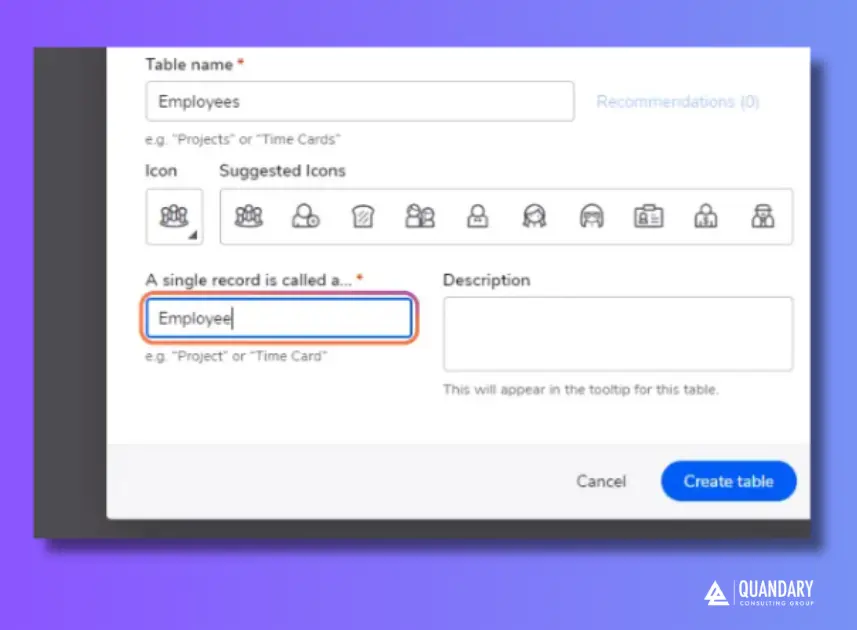
Step 6: Enter a single record name (e.g., "Employee").
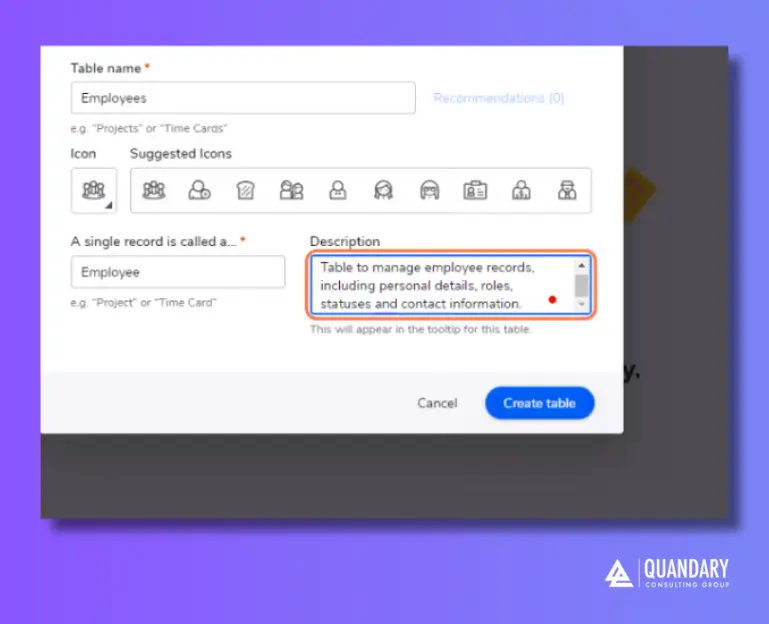
7. Add a description
- This is an optional step - but is highly recommended
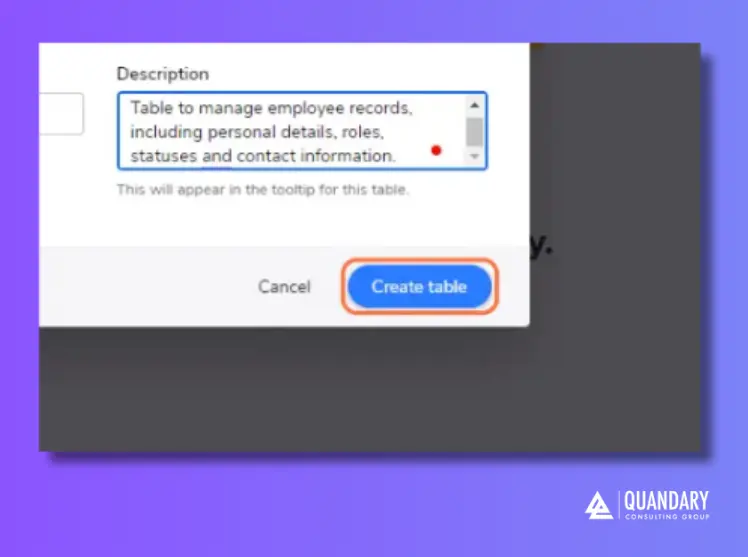
8. Click Create Table to save your changes and add the new table to Quickbase.
What is a Field in Quickbase (the “details”)
A field is a single piece of data about a record—like a column in a spreadsheet.
Example (Projects table fields):
- Project Name
- Start Date
- End Date
- Status
- Budget
- Project Manager
Each record in the table has a value for each field.
Different Types of fields in Quickbase (very important)
Quickbase has several different field 'types' available to choose from. The field type you will use will depend on the kind of data you will using in the Table Field; here are the the types of Quickbase Fields available for you to select from:
Quickbase Text fields
- Store words or sentences
- Example: Project Name
Quickbase Numeric fields
- Store numbers
- Example: Budget, Quantity
Date/Time fields [in Quickbase]
- Store dates or timestamps
- Example: Start Date
Quickbase Checkbox (Yes/No)
- True/False values
- Example: Completed?
Quickbase User fields
- Link to a Quickbase user
- Example: Assigned To
Quickbase Formula fields
- Automatically calculated
- Example: Days Remaining = End Date – Today
Quickbase Lookup fields
- Pull data from related tables
- Example: Show Client Name in Projects table
Why Do We Use Fields in Quickbase
Fields help you organize data in a record that is easy to understand and use. Avoid replicating fields when the data already exists in the database.
For example, do not create an additional 'Employee Name' field in the 'Payroll' table since this information is already stored in the 'Employees' table.
Instead, you can use the table-to-table relationship to add a lookup field in the Payroll table that displays the 'Employee Name' from the Employees table.
How to Create Fields in Quickbase
Before you start, here are a few quick tips to keep in the back of your mind while you build:
- Field names should be consistent across the application.
- Names should be short and descriptive.
- Add a field description in the field settings to explain the purpose of the field.
- Do not forget to list any dependencies, formulas or notes (if they are an important part of a specific process, such as a pipeline, webhook, or code page).
Similar to Tables, there are two ways to create Fields in Quickbase:
- Option 1: Using the Visual Builder
- Option 2: Using the New Table Feature=
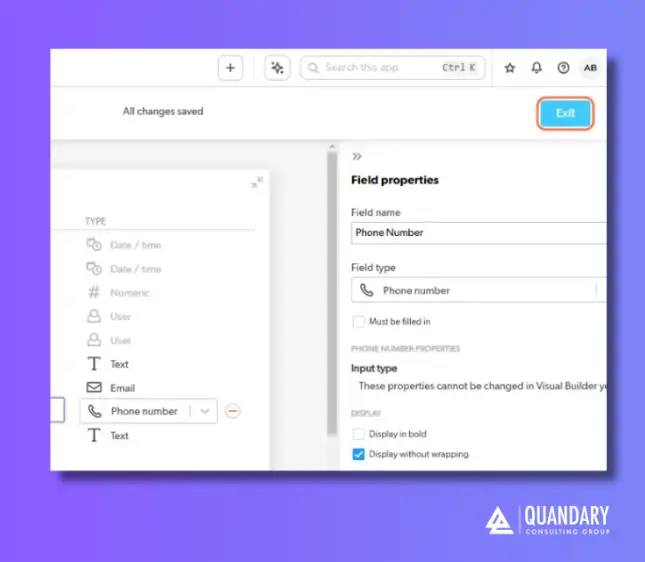
Option 1: How to Create Fields in Quickbase Using the Visual Builder
Step 1: From the My Apps page in your Quickbase app, open the app to which you want to add a table
Step 2: Click App Settings in the sidebar or from the App Home page
Step 3: Click on Structure to open the Visual Builder
Step 4: From the left column, drag and drop the desired field type into the table where you want to create fields
Step 5: Enter the Field name
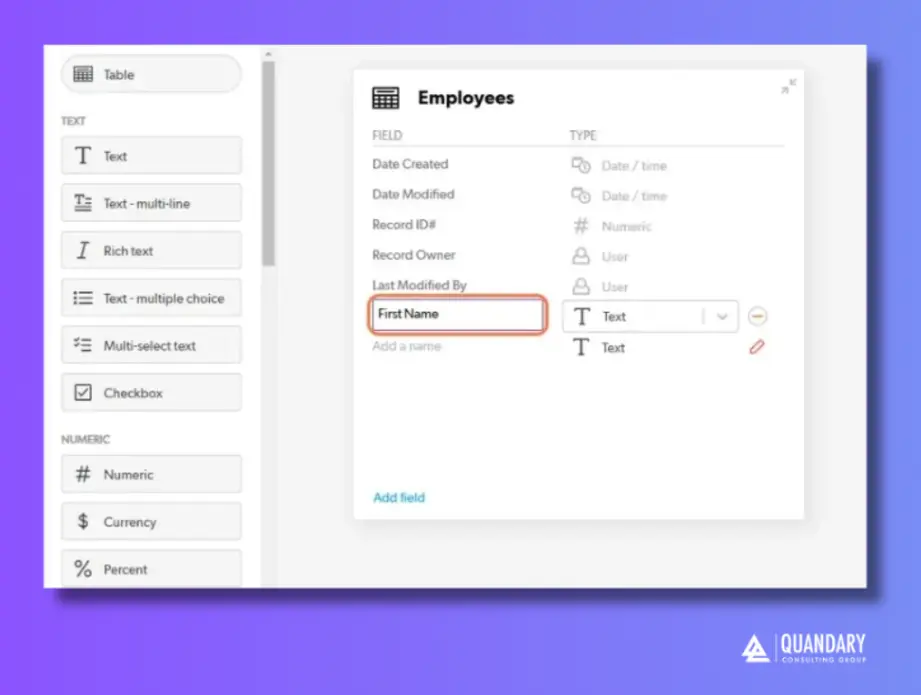
Step 6: You can also use the add field options within the table to add a field name and choose a field type
Step 7: Repeat steps 4 and 5 or 6 for additional fields.
Step 8: Click Exit when you’re finished
- All changes in Quickbase are saved automatically
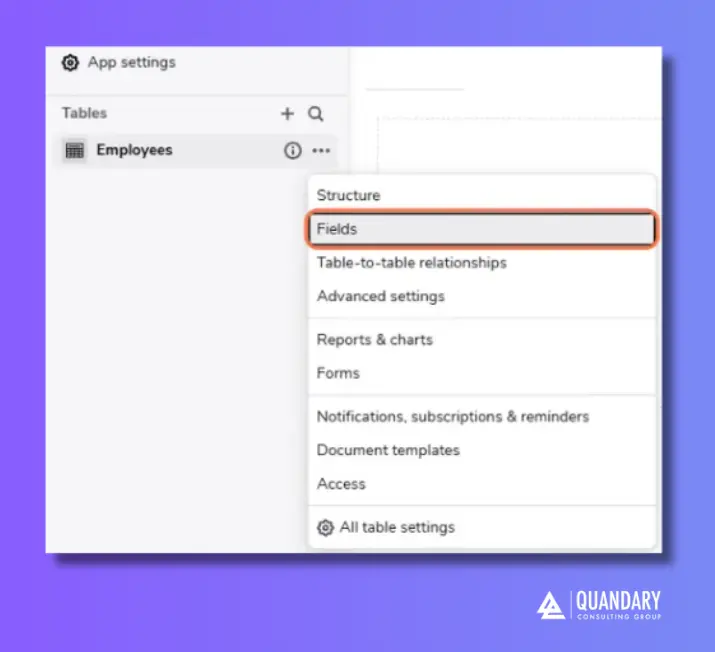
Option 2: How to Create Fields in Quickbase Using Using the Table Settings
Step 1: In the sidebar, click the three dots next to the table you want to add your new field(s)
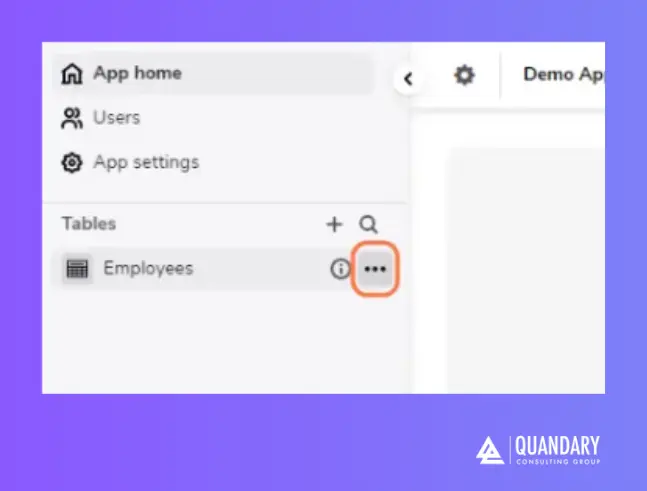
Step 2: Click Fields
Step 3: Click on + New Fields.
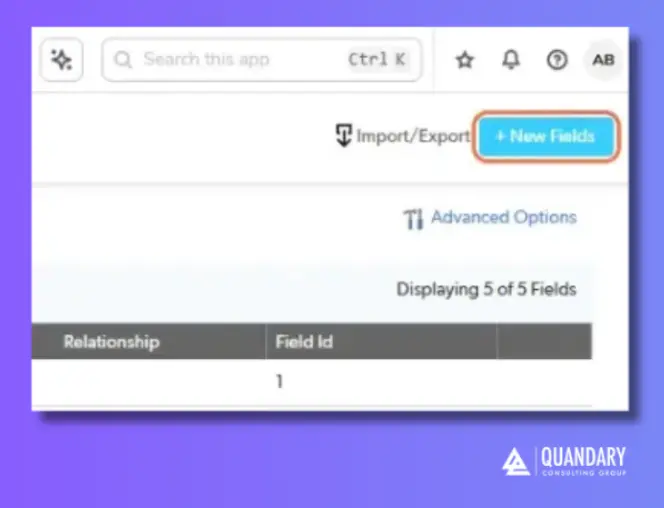
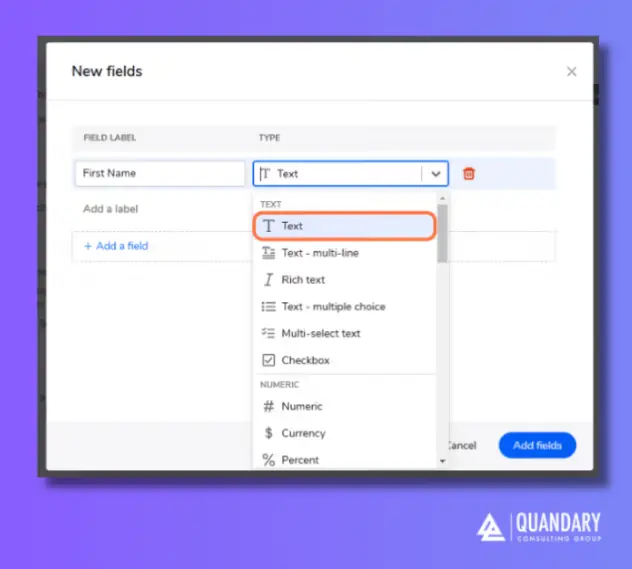
Step 4: Enter a Field name
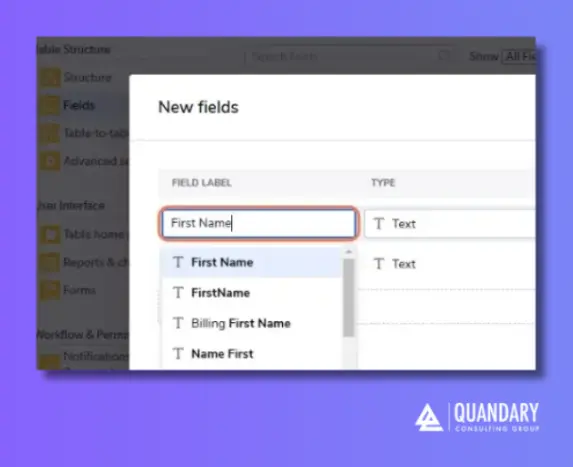
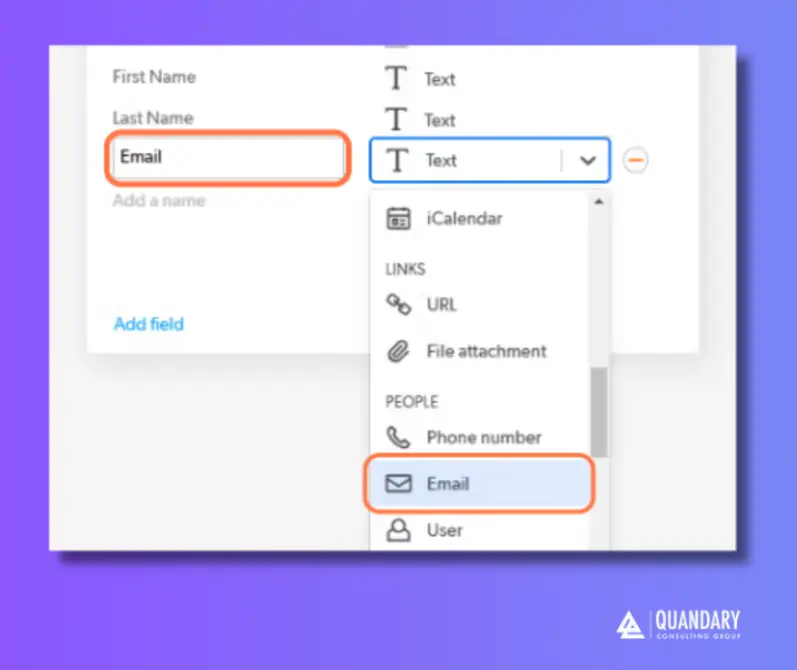
Step 5: Select the appropriate field type from the drop-down.
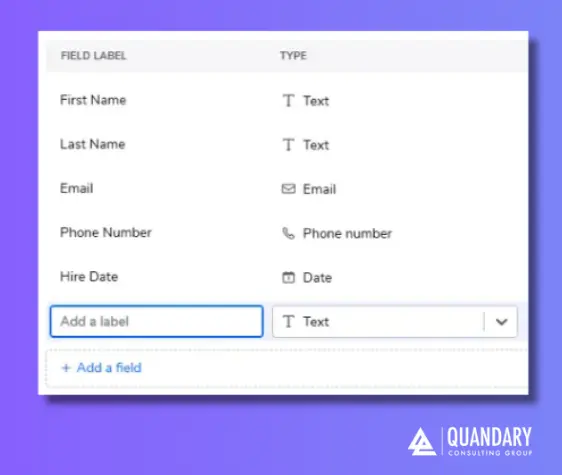
Step 6: After entering the field name and type, Quickbase will automatically add a row below, allowing you to enter details for the next field.
- Repeat this process to add as many fields as needed.
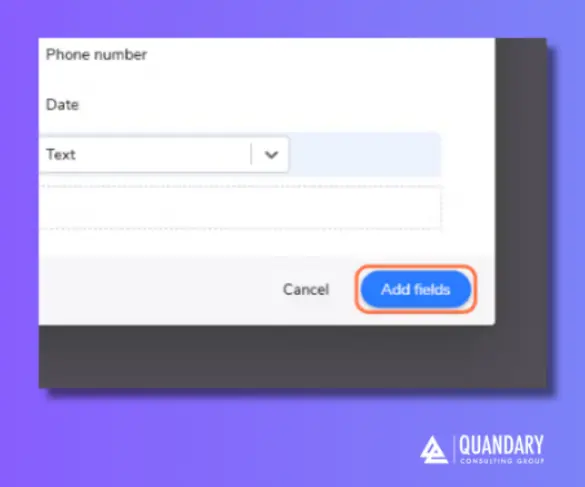
Step 7: When you have added all fields, select the Add Fields button.
Remember: The Best Way to Keep Data Organized in Quickbase is Tables
Tables organize different types of data, fields define specific details for each record, and relationships link tables to avoid data duplication.
Understanding Quickbase tables and fields lets you:
- Design better apps
- Build relationships between data
- Create meaningful reports
- Automate workflows correctly
Following these practices helps you create a Quickbase app that is efficient, scalable, and easy to manage.
- Author: April Barragan
- Email: abarragan@quandarycg.com
- Date Updated: 03/18/2025
Quickbase Tables and Fields – FAQs
What is the difference between a table and a field in Quickbase?
A table in Quickbase stores a collection of related records (similar to a spreadsheet tab), while a field is a single data point within that table (like a column).
For example, in a Projects table:
- Table = Projects
- Fields = Project Name, Start Date, Status
Quick answer:
- Table = where data is stored
- Field = what data is stored
This is one of the most common beginner questions when learning Quickbase app design.
How many tables and fields can you have in a Quickbase app?
Quickbase supports multiple tables per app and hundreds of fields per table, depending on your plan and performance considerations.
While there’s no small fixed limit for most users:
- Most business apps use 5–20 tables
- Tables commonly contain 20–100+ fields
Best practice: Keep your app structure simple and avoid unnecessary fields to ensure better performance and easier reporting.
When should I create a new table vs. a new field in Quickbase?
Create a new table when you are storing a different type of data.
Create a new field when you are adding more details about the same data.
Examples:
- New table → Tasks (separate from Projects)
- New field → Budget (added to Projects table)
Rule of thumb: If one record can have multiple related items (like one project with many tasks), you should create a separate table with a relationship.
This is a key concept for building scalable Quickbase apps.
What are lookup fields and formula fields in Quickbase?
In Quickbase, both lookup and formula fields automate data—but they work differently:
- Lookup fields pull data from a related table
- Example: Display Client Name in the Projects table
- Formula fields calculate values using other fields
- Example: Days Remaining = End Date – Today
Quick comparison:
- Lookup = pulls data across tables
- Formula = calculates data within a table
These field types are essential for reducing manual data entry and improving data accuracy.

Resources


© 2026 Quandary Consulting Group. All Rights Reserved.
Privacy Policy