
Knowledge Base
Articles In This Section
How to Create User Groups in QuickbaseHow to Share your Quickbase Application with Everyone On The Internet (EOTI)How to Archive Records in Quickbase Using Role PermissionsHow to Use and Adjust Roles in Quickbase | BeginnerHow to Switch a Client to a New Quickbase Developer How to Display Information for Certain Roles in QuickbaseHow to Use Conditional Filters in Quickbase for Role-Based Record PermissionsHow to Add New Users to your Quickbase ApplicationHow to Modify or Deny a User's Access in QuickbaseHow to Use and Adjust Roles in QuickbaseSections
How to Add a New User Role in Quickbase
Quickbase Roles allow us to differentiate users performing specific jobs within an application. They can be used to assign various levels of access to tables and fields, show and hide particular data and influence users’ workflow across the application.
The successful implementation of roles will create an efficient workspace for all users.
What are the Built-in User Roles in Quickbase?
When you create an app, Quickbase creates three roles automatically:
Quickbase "Viewer" User
- This user can view and use your app.
- This user does not have the ability to manage users or customize the app.
- This role is granted Basic permissions.
Quickbase "Participant" User
- This user can view and use your app, and manage users.
- This user does not have the ability to customize the app.
- This role is granted Basic, Sharing permissions.
Quickbase "Administrator" User
- This user can view and use your app, manage users, and customize the app, including app properties, structure, and roles.
- This role is granted Admin, Sharing permissions.
Quickbase "Default" User
When you edit roles in an app, you can set one role as the default role.
The default role is the one that is initially selected when you:
- Share your app
- Import users
- Add a user from a form field
How to Create a New User Role in Quickbase?
- Once you have appropriate permissions, you can visit the Roles main page by navigating to the Users table
- Click Manage Roles. You can also get there from your application home page by visiting Settings > Roles.
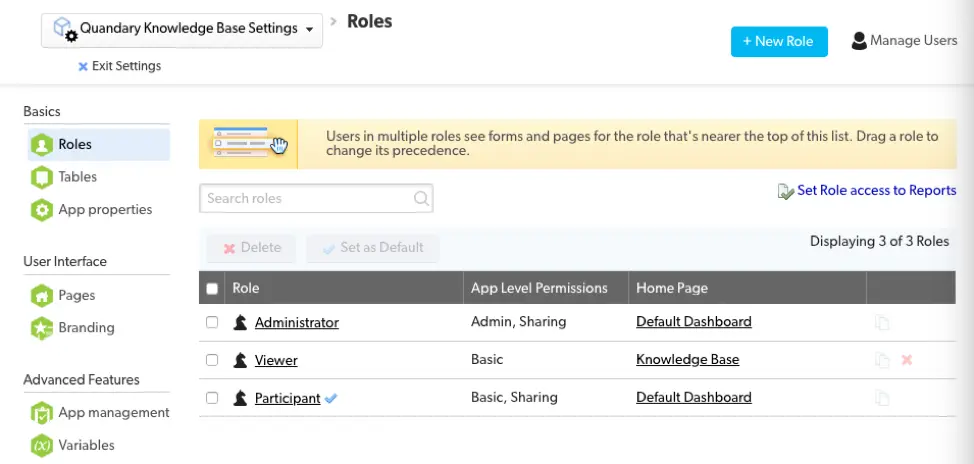
- To add a new Role, click the + New Role button to the top right of the screen.
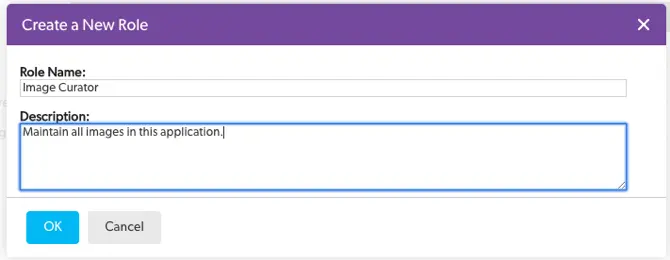
- After doing so, you will be prompted to provide a Role Name and optional Description for the new role you are creating.
- Click OK to save.
- Once the role has saved, you will be directed back to the Roles homepage where you will see your new role added to the list of existing ones.
- The App Level Permissions will be Basic and the Home Page will be set to the Default Dashboard.
- You can update the name and description any time from the Properties tab.
How to Set Role Permissions In Quickbase?
Now that you’ve added a new role, you will want to define what Users in this role will be allowed to do in your application.
To get started, click the Name of your new role to enter the detailed view.

Under the App Access section, there are three checkbox options you can adjust for the new role, based on which ones you select, the role will be given one of the following permission levels:
- None: Select Disable access to app for users with this role. This will prevent any users in this role from accessing your app. This is useful if you want to turn off access for certain users in one app, while allowing access to other apps in your realm.
- Basic: Do not select any checkboxes. This is the default role that should be chosen for users who need access to the app, but do not need any administrative controls. Users in this role will not be able to customize the app or manage users.
- Basic, Sharing: Select the Manage users and share the app. In addition to the Basic permissions above, users will be able to manage ALL users in the application. Although these users can share the application with others, Quickbase prevents them from granting or revoking Full Administration access for any user.
- Admin: Select Edit app structure and permissions. This grants Full Administration access WITHOUT the ability to manage users. This role is best for application builders who do not necessarily need to share the app or monitor who is in the app.
- Admin, Sharing: Select both Manage users and share the app and Edit app structure and permissions. This grants Full Administration rights to the user for app customization and sharing.
How to Configure Table Access in Quickbase?

Under the Table Access section, you can define specific permission levels for each table for viewing, adding, modifying and deleting records.
The Add and Delete checkboxes are used to specify whether the user can add/delete records in the table.
- View and Modify allow for significantly more customization options:
- None: Grants no access to the table.
- All Records: Grants view/modify rights to any record in the table.
- Group’s Records: Grants view/modify rights to only records created by users in the same group.
- Custom Rule: Allows you to specify parameters for view/modify access. After selecting this option, click the Edit icon to configure the criteria for access in a new popup window.
Select the Save Common Reports checkbox if you want to allow users to save reports visible to all other users of you app.
The Edit Fields Properties checkbox will allow users to edit field properties within the specified table.
Use the Fields dropdown to control access to table fields. You initially select either Full Access, No Access or Custom Access. Selecting Custom Access will allow you to configure permissions for individual fields.
How to Use Quickbase's User Interface?
The User Interface tab allows you to control what users will see when they access the application by showing and hiding selected elements.
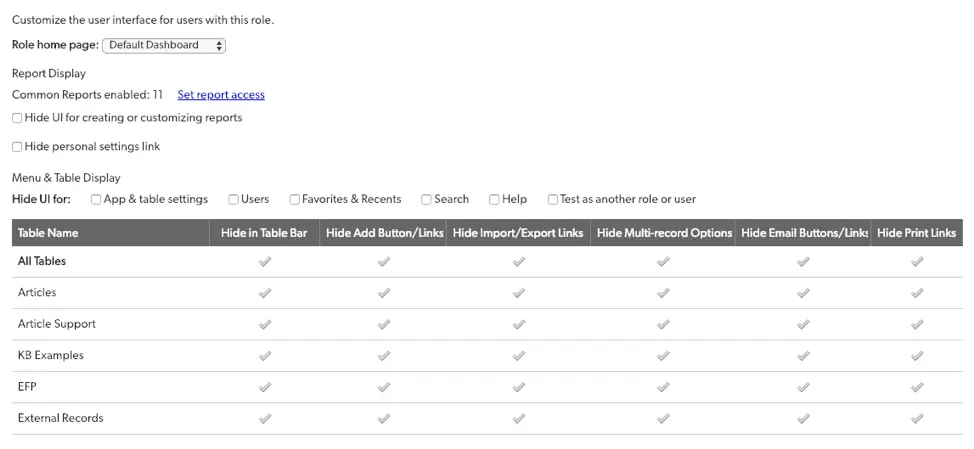
- Use the Role home page: dropdown to select which page the user sees when they visit Home.
- Click the Set report access link to customize which reports the user can see. By default they will have access to List All and List Changes.
- Use the Hiding UI for creating or customizing reports checkbox to toggle the users ability to create or change reports. Be sure to unselect the Save Common Reports checkbox in the Permissions tab, otherwise the user will be able to create common reports but never edit them.
- Select the Hide personal settings link checkbox to prevent the user from accessing settings through their dropdown at the top right of the navigation.
- You may also hide UI for the following: App & table settings, Users, Favorites & Recents, Search, Help and Test as anther role or user.
- Use the checkbox columns to control access to which tables appear in the Table Bar, hide:
- Add Buttons
- Import/Export Links
- Multi-record Options
- Email Buttons/Links
- Print Links
Creating user roles in Quickbase is essential for maintaining security, improving workflows, and ensuring users only access the information they need. Proper role management helps organizations scale Quickbase applications safely and efficiently across departments and teams.
Whether you are building internal operations apps, managing projects, or implementing enterprise workflow automation, a well-structured Quickbase permission strategy is critical for long-term success.
- Author: April Barragan
- Title: Solution Consultant | Quickbase
- Email: abarragan@quandarycg.com
- Date Updated: May 1, 2026
Top 10 FAQs About Importing Data into Quickbase
1. How Do I Import Data Into Quickbase?
Importing data into Quickbase is simple and can be done using CSV, Excel, Google Sheets, or integrations from other platforms. To begin:
- Open your Quickbase app
- Select the table where you want the data imported
- Click Import/Export
- Upload your file
- Match fields correctly
- Run the import
Quickbase automatically detects column headers and helps map fields for cleaner imports.
2. What File Types Can Quickbase Import?
Quickbase supports multiple file formats, including:
- CSV (.csv)
- Excel (.xlsx, .xls)
- TSV files
- Google Sheets (via integrations)
- API imports from third-party systems
CSV files are typically the fastest and most reliable method for bulk data imports.
3. Why Is My Quickbase Import Failing?
Common reasons Quickbase imports fail include:
- Incorrect field mapping
- Duplicate key fields
- Invalid date formatting
- Required fields left blank
- Unsupported file formatting
- Character limit violations
Before importing, clean your data and validate formatting consistency.
4. How Do I Map Fields During a Quickbase Import?
Field mapping tells Quickbase where imported data should go. Quickbase allows manual mapping or automatic matching based on field names.
Best practice: Always verify field types before importing to avoid broken relationships or formatting issues.
5. Can I Import Related Records Into Quickbase?
Yes. Quickbase supports relational database imports.
You can import:
- Parent-child relationships
- Reference tables
- Linked records
- One-to-many datasets
To do this correctly, use unique identifiers such as Record IDs or Key Fields.
Example: A construction company importing projects and subcontractors into Quickbase can connect tables using Project IDs.
6. How Can I Automatically Import Data Into Quickbase?
Automatic imports can be achieved using
- Quickbase Pipelines
- APIs
- Workato
- Zapier
- Make.com
- ETL tools (like Fivetrain)
- Scheduled CSV imports
Automated imports reduce manual entry and improve operational efficiency. Businesses frequently automate imports from:
7. What Is the Best Way to Clean Data Before Importing Into Quickbase?
Before importing, here are some quick ways to make sure your data is clean before you start:
- Remove duplicate rows
- Standardize date formats
- Eliminate blank records
- Validate email addresses
- Ensure consistent naming conventions
- Check for invalid characters
Clean data improves reporting accuracy and automation reliability.
8. Can Quickbase Import Large Data Sets?
Yes, Quickbase can handle large imports, but Quickbase performance depends on a few things:
- Number of records
- Field complexity
- Relationships
- Attachments
- Formula fields
For very large datasets, we suggest:
- Break imports into batched
- Use CSV instead of Excel
- Import during off-peak hours
- Disable unnecessary automations temporarily
Enterprise organizations often use APIs for high-volume Quickbase data migrations.
9. How Do I Import Data Into Quickbase Without Creating Duplicates?
To prevent duplicates:
- Use a unique key field
- Enable merge/update options
- Validate existing records
- Use Record IDs when updating
Quickbase allows you to:
- Add new records
- Update existing records
- Merge imports intelligently
This is especially important for CRM, inventory, and project management applications.
10. Should I Use Quickbase APIs or Manual Imports?
It depends on your use case.
Manual imports are ideal for:
- One-time uploads
- Small datasets
- Non-technical users
API imports are better for:
- Real-time syncing
- Enterprise integrations
- Automated workflows
- High-volume data operations
Organizations scaling Quickbase across multiple departments often move toward API-driven integrations for long-term efficiency.


Industries
Resources


© 2026 Quandary Consulting Group. All Rights Reserved.
Privacy Policy