
Knowledge Base
Articles In This Section
What Are Quickbase Dashboards Set Up Personalized Dashboards Using User-Filtered ReportsHow to Create a Dashboard in QuickbaseEmbedding an I-Frame (Webpage Widget) in a Dashboard | BEGINNERHow and When to Use Calculated Columns for Quickbase Reports How to Create Summary Report in Quickbase Utilizing the Dashboard Side Bar | BEGINNERHow to Build an Operations Dashboard in Quickbase | INTERMEDIATE to ADVANCEDHow to Color-Coding Rows for Quickbase Reports Using Automations to Log Approval Time and User in QuickbaseHow to Create External Stakeholder Forms, Reports, and Dashboards in QuickbaseUpdating the Default Table Home Page and Default Report Columns | BEGINNEROrganizing & Assigning Groups To Reports | BEGINNERLinking Dashboards Together | BEGINNERSetting Up Report and Chart Types in Quickbase | BASICSUsing Rich Text to make your Dashboard Pop | BEGINNERUsing Report Formulas as a Filter in a Report in QuickbaseKanban Reports | BEGINNERHow to Create an Audit or Change Logs with Automations Understanding and Setting Up Subscription Emails in Quickbase How to Set Up Pie Reports in Quickbase How to Build Standard Reports in Quickbase | BEGINNERAdding Reports to Dashboards | BEGINNERSections
Create Audit/Change Logs with Automations | INTERMEDIATE
Quickbase has limited out-of-box options for tracking changes to your records. This article will demonstrate how to create your own customizable audit/change log using Quickbase Automations.
If you’re not already familiar with Automations check out this short blog post from Quickbase demonstrating the basics.
Why would you want to track changes in Quickbase? Here are a few examples:
✓ Log important changes to your project such as change of Status or Project Manager
✓ Log a record of changes to employee compensation such as salary and bonus
✓ Identify when a user makes changes to or deletes an invoice, for greater accountability
In this article we’ll use the first example, “Log important changes to your project such as change of Status or Project Manager,” to demonstrate how to set up a change log.
- Start by creating a ‘Projects’ table and add the following fields:
| Field Name | Field Type | Field Values |
|---|---|---|
| Project Name | Text | N/A |
| Project Manager | Multiple Choice | "Jane Doe", "John Doe" |
| Project Status | Multiple Choice | "Open", "Closed", "Lost" |
We’ll keep it simple and just add these three fields for now. On a real project you’d typically have many more fields.
- Next, create a “Project Logs” table and add the following fields.
| Field Name | Field Type |
|---|---|
| Project Name | Text |
| Project Manager | Text |
| Project Status | Text |
- Create a relationship between the two tables where “Each Project has many Project logs”

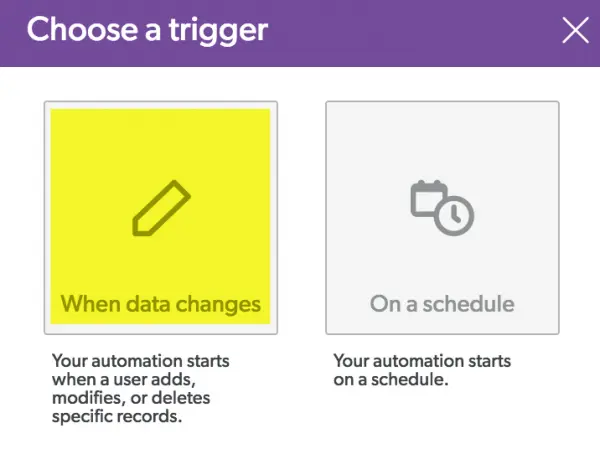
- Go to the ‘Automations” section under of you applications “Settings”. Click “New” under the Automations section. Two options will appear. Select the option “When data changes”:
Automations are made of two components; a trigger and an action. The trigger starts the automation (On a schedule or based on a change in QB). The action can add, modify or delete records.
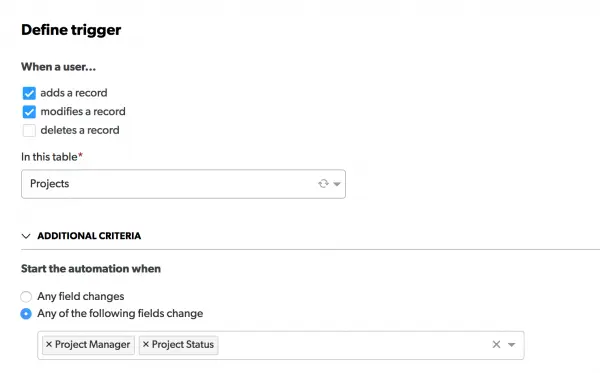
- Start by defining your “Trigger”:
- Under “When a user…”, select “Adds a record” and “Modifies a record”
- Under “In this table”, select “Projects”
- Click the carrot symbol next to “Additional Criteria” and select “Any of the following fields change”. Add “Project Manager” and “Project Status”.
- When complete your trigger should look like this:
- Now we’ll define our “Action”:
- Click “Add an action” in the upper right of the screen or by click “Add Action” on the left panel under actions to add your first action.
- Chose the option “Modify record(s)”.
- In the resulting screen choose “Project Logs”.
- Now “Select fields and specify values for the record” as shown below:
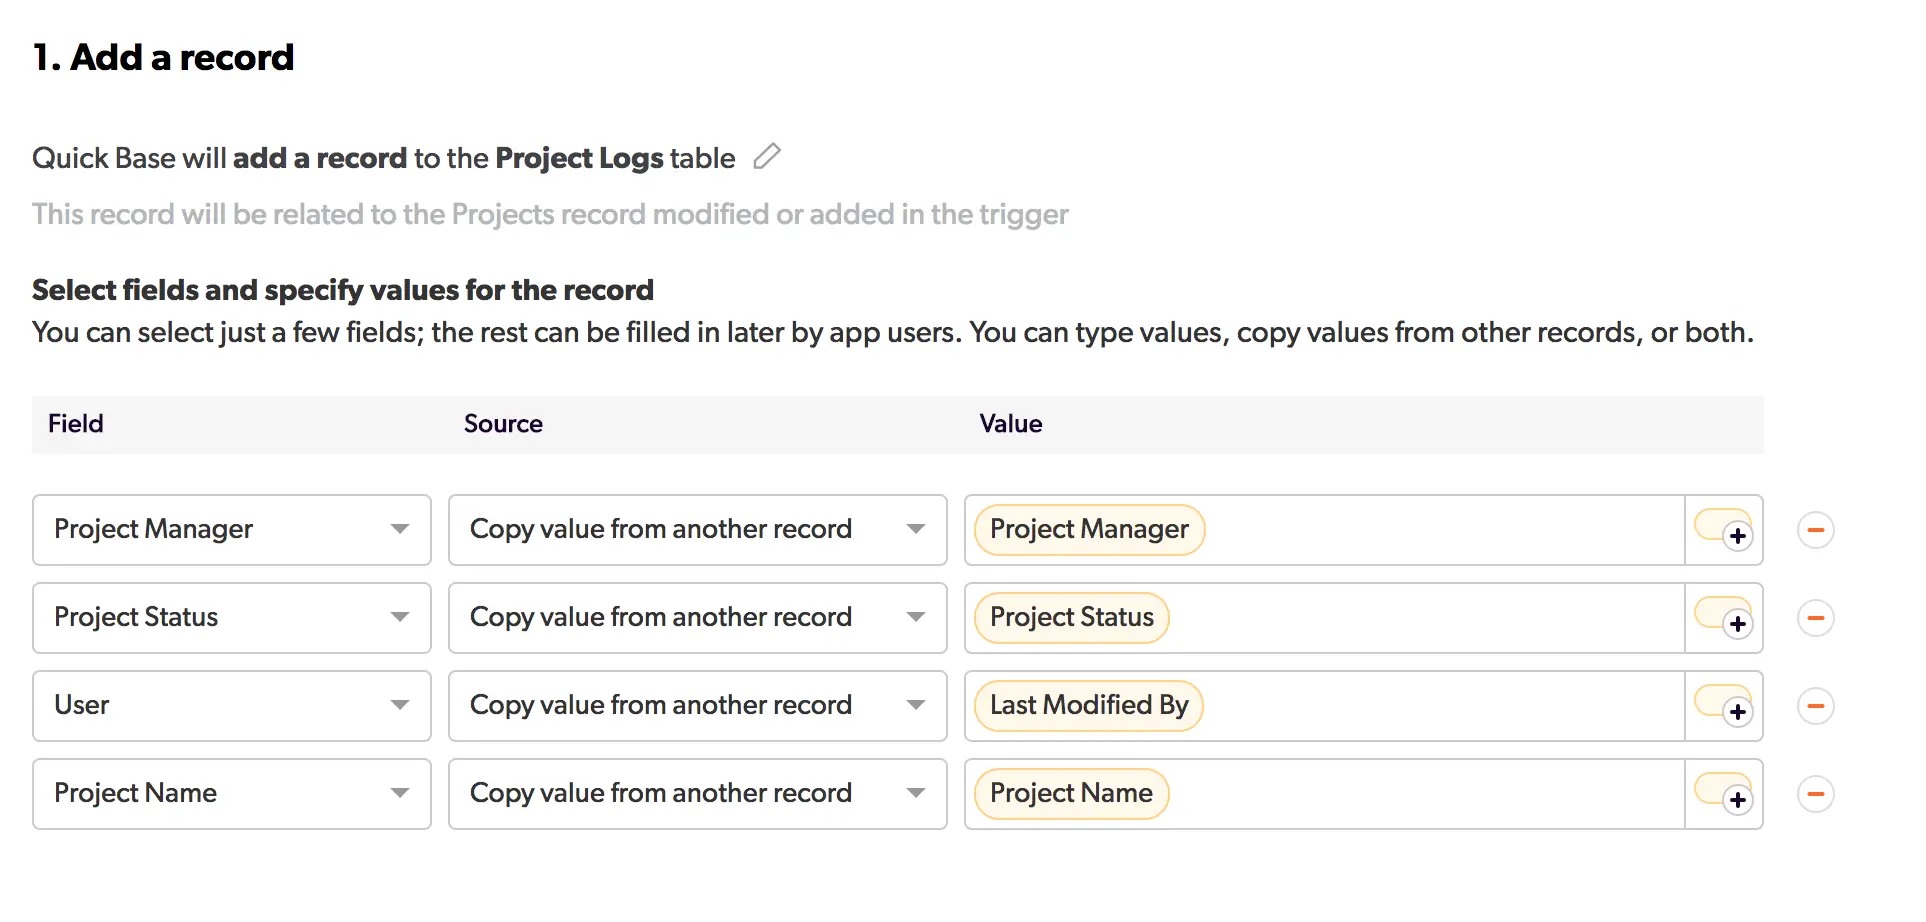
- When finished, save your automation.
The results:
- Now each time a ‘Project’ record is saved or modified, a log of changes to the “Project Name’, ‘Project Manager’ and ‘Project Status’ will be recorded. The User field will capture whomever made the modification by using the ‘Last Modified By’ fields in the ‘Projects’ table.
- Go ahead and test with a record in your project table by adding a record. A new record will appear in the ‘Project Logs’ table. You can also view a history of project logs on the embedded report on your project record:
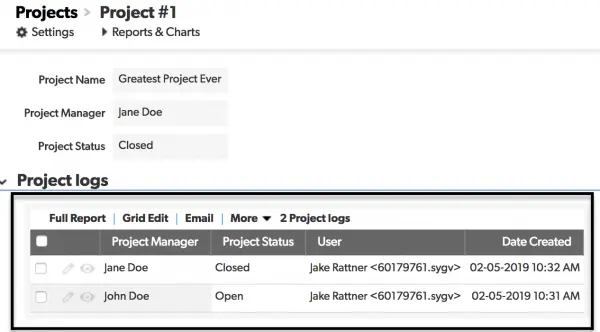
Now whenever you view your Project record you can see a history of any changes made to the fields we’ve selected to track.
– NOTE: Quick Base has designed the Audit Logs feature with security and compliance use cases in mind. Audit logs track user activity, including data changes, in a non-editable format. You can set up those logs to be retained for up to 7 years. Because Quick Base records can be edited, you should never use data change logs created by automations as part of any security or compliance initiative. If you’re interested in adding audit logs to your account, please contact sales@quandarycg.com.
For a simpler, but less robust method to capture change history, see our article on snapshot fields.
- Author: Jake Rattner
- Email: jrattner@quandarycg.com
- Date Submitted: 2/4/2019

Resources


© 2026 Quandary Consulting Group. All Rights Reserved.
Privacy Policy