
Knowledge Base
Table-to-Table Import | INTERMEDIATE
Your Quickbase Table-to-Table Guide
Quickbase allows users to create Table-to-Table Imports to move data from one table to another. A Table-to-Table Import is an automation. Once you set it up, there is no action required. Instead, the automation will run based on the trigger chosen in the automation.
Below, the three most common use cases for Table-to-Table Imports will be covered.
Quickbase Table-to-Table Imports Use Cases
1. Aggregate Data from Multiple Applications
Users, especially managers, likely use multiple applications within a Quickbase realm. This architecture is great for segregating data and customizing apps for specific uses.
But, it can slow review processes because managers cannot compare records from multiple apps side-by-side. By creating a new app and Table-to-Table Imports, you can aggregate information from multiple apps into the new, centralized app.
2. Limit Information Displayed
As your apps have grown and become more complex, you have probably had to limit the information displayed to certain user groups. Along with the form rules, app-level, and field-level permissions, you can create a Table-to-Table Import to specify exactly which fields are imported.
This ensures there is no risk of displaying sensitive information to particular user groups that have access to the destination table of the Table-to-Table Import.
This is especially useful when displaying information to third parties like customers or suppliers.
3. Archiving Information
Over time, apps accumulate a lot of records, some of which can be unnecessary for day-to-day operations. For example, it is probably not necessary to maintain invoices from more than a year or two ago in your active app. At the same time, you do not want to erase this information permanently.
A Table-to-Table Import is a perfect solution to move this old data to an archiving app. This makes it possible to remove the records from your active app and improve performance.
Merge vs. Copy with Table-to-Table Import
The most important decision to make when creating a Table-to-Table Import is the Import Type. In a Table-to-Table Import, records can be merged or copied.
What Is Copy Table-to-Table Import?
This is the more simple option. It will transfer records from the source table to the destination table and create new records in the source table every time the import runs.
For example, if there are 20 records in the source table and the import is scheduled to run every day. After two days, there will be 40 records in the destination table.
This functionality is useful if you want to see how records progress over time or archiving information. Once the information is transferred to the destination table, the records in the source table will be removed.
What Is A Merge Table-to-Table Import?
This is slightly more complex than Copy Table-to-Table Import. This automation will take the records from the source table and merge or create new records in the destination table.
For example, if there are 20 records in the source table and the import is scheduled to run daily. Every day, the 20 records in the destination table will be updated to match the 20 records from the source table.
On the 3rd day, if there are 10 additional records added to the source table, then, when the automation runs, the 20 original records will be updated. As a result, 10 new records will be added to the destination table.
This is accomplished using the merge field (see How to Create a Table-to-Table Import below for more information).
How to Create a Table-to-Table Import (12 Steps)
Step 1. Create the destination table and its fields in a new or existing app.
If you are creating a Merge Table-to-Table Import, you must create a Merge Field in the source table.
This field should be type formula-text. Best practice is to use the formula: “Table Name”&[Record ID#] – by including record ID in the formula. This ensures each record’s Merge Field is unique.
In the destination table, make certain to create a Source ID field. This field should be type text and must be unique. In step 9, you will map the Merge Field from the source table to the Source ID field in the destination table.
Step 2. On the new table homepage, click ‘More’ then ‘Import/Export’.
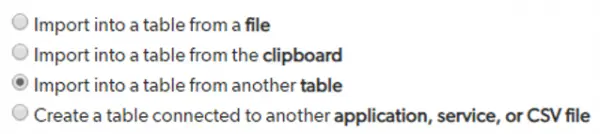
Step 3. Choose the ‘Import into a table from another table’ radio button.
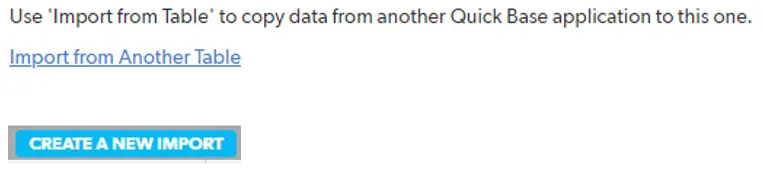
Step 4. Click ‘Import from Another Table’ then click ‘CREATE A NEW IMPORT’
Step 5. Name the import.
Step 6. Choose the source table.
Step 7. Choose the import type: copy or merge.
Step 8. Choose if all records should be imported or if only records meeting certain criteria should be imported in the matching section.
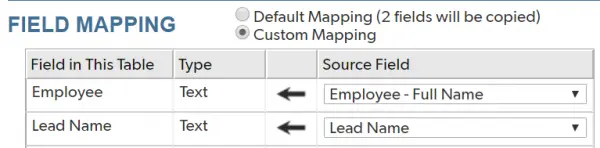
Step 9. Map fields from the source table to the destination table.
Step 10. Save the new import.
Step 11. Navigate to automations (settings > automations) and create a new one.
Step 12. Set up the trigger and then add an action (Table-to-Table Import).
If you want to learn more about customizing a role’s access, check out the article: Displaying Information for Certain Roles.
- Author: TJ Lawless
- Email: tlawless@quandarycg.com
- Date Submitted: 2/14/2019

Resources


© 2026 Quandary Consulting Group. All Rights Reserved.
Privacy Policy