
Knowledge Base
Quickbase Developers’ Guide: Webhooks 101 | BEGINNER
Quickbase Webhooks are a useful way to connect different web applications and services. Quickbase supports webhooks to trigger actions in response to events in the platform (usually an action performed by a user.)
Using Quickbase Webhooks, you can automate workflows and streamline processes easily. As a Quickbase developer, knowing how to use webhooks will significantly enhance and expand the solutions you can create.
By the end of this article, you will know what a webhook is, why they’re important, and how to set one up.
What Is Quickbase Webhooks?
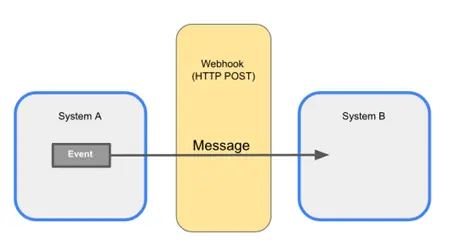
A webhook is a way to communicate data across the internet, usually triggered by a user event–for example, adding, updating, or deleting a record in Quickbase.
For example: You can set up a webhook to automatically create a new task in the same Quickbase application when a new record is added to a Quickbase table. You could also set it up to create a different application in Quickbase (or an entirely separate and external platform, such as the project management tools Asana or Trello).
Webhooks can trigger actions (such as sending notifications to team members in Slack or updating records in other systems) when a record is updated or deleted.
With the webhook connector, you can send HTTP requests to external services, pass data in JSON or XML format, and receive responses in Quickbase (usually to confirm the data was received).
The Importance of Webhooks
The main reason for using Webhooks is to avoid having users enter data in multiple places.
The Webhook ensures the same data is communicated to other systems in real time (instead of having a user enter data repeatedly in different places). possibly forgetting to update one system or even entering the data incorrectly from one system to the next.
When to Use Quickbase Webhooks
- You have an available API.
- You need to enter data into multiple systems automatically from one entry point.
- You need real-time notifications to other services or applications.
- You need an alternative to Quickbase Pipelines for creating, updating, or deleting records.
When to Not Use Quickbase Webhooks
You use too many webhooks.
- Quickbase has a hard limit of 10 webhooks per table.
There is a high volume of events.
- If your application generates a large number of events that trigger webhooks, it can put a strain on the receiving server.
- Note: In such cases, you should consider polling the API to retrieve the data periodically as Quickbase limits webhooks to 50.
The message is too large.
- Quickbase limits payload size to 4MB.
The records are too large.
- Quickbase sets a hard limit on the size of a record triggering a webhook to 1MB.
The application requires a synchronous response.
- Webhooks are asynchronous, meaning that the response is not immediate.
- If your application requires a synchronous response, such as in a payment gateway, webhooks may not be the best option.
- Note: In such cases, you may want to consider a different approach, such as a direct API integration.
You need to guarantee delivery.
- Webhooks rely on the reliability of the network and the endpoint to deliver messages.
- If your application requires guaranteed message delivery, webhooks may not be the best solution.
- Note: In such cases, you may want to consider a different approach, such as a message queue or a retry mechanism. Pipefy and Workato both offer this feature.
Benefits of Webhooks
- Webhooks broadcast information users enter once in a single place to numerous places in real time. This increases productivity and reduces the need to poll or check for updates.
- Unlike polling (which creates constant server traffic) webhooks are event-based and generally require fewer resources.
- With webhooks, applications can respond to events as they happen without waiting (i.e. polling on a schedule). This leads to more efficient workflows and improved performance.
- For example, an email service can automatically send a welcome email when a new user registers.
- You can also create multiple child records (for example, a questionnaire) from a single event.
Challenges of Webhooks
- It can be difficult to tell if a webhook fails. Only the developer who created the webhook receives an email notification if there is a problem.
- Other developers must go to the webhook section of the table settings and review the error history.
- If the receiver (endpoint) is down, messages can be lost unless there’s a retry mechanism in place.
- If a webhook source is high-traffic, it can overwhelm the receiving application. This is especially true if there’s no throttling in place.
- Rate limits might need to be enforced to prevent overloading your systems.
- If the structure of your app or the service you send data to changes, you will likely have to update your webhook as well.
How to Create a Webhook in Quickbase
Here is a step-by-step guide for creating a webhook in Quickbase. Follow these steps to create a successful webhook automation every time.
Step 1: Create a +New Webhook
Go to the Table Settings for the table where the user will trigger the webhook. Look for the Webhooks section and click the +New button (See Fig 1).
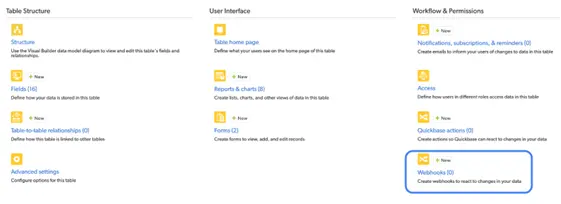
Fig. 1
Note: The interface is very similar to the Quickbase Notifications interface (See Fig. 2).
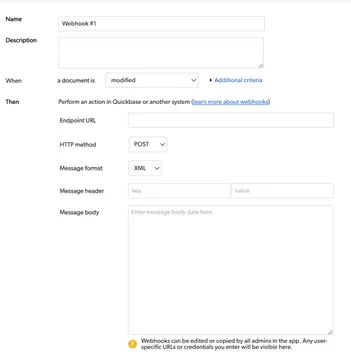
Fig. 2
Step 2: Name the Webook
Give your webhook a concise and meaningful name so you will remember what it does. Your future self and any developers who follow you will be grateful for a detailed description.
Step 3: Set the Trigger
You need to be specific with the webhook trigger. Do you want the webhook to fire when a record is modified, added, or deleted? Some combination of those or all three? If you want it to fire when a record is modified, is it when any field changes or just a particular field?
Think carefully about what causes your webhook to fire. Then, set the trigger (See Fig. 3).
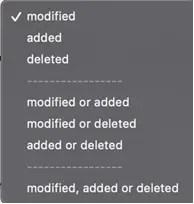
Fig. 3
Step 4: Set the Endpoint URL
Set the endpoint URL your webhook will hit.
For example, if you want to create a record in another table in Quickbase, enter the full URL, including the tableID (without any additional modifiers).
In this case:
https://myrealm.quickbase.com/tableID
NOT:
https://myrealm.quickbase.com/tableID?a=td

Fig. 4
_ Note: You can add dynamic data to your URL based on fields and markers from the application and table (See Fig. 4)._
Step 5: Select the HTTP Method
Select the HTTP Method you want to use (See Fig. 5).
For example, you will use POST for Adding, Modifying, or Deleting records in Quickbase.
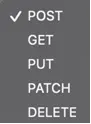
Fig. 5
Note: You will most often use POST. Still, you should know what kind of method your endpoint requires.
Step 6: Select Message Format
Select the message format you want to use (See Fig. 6). Again, this might depend on the requirements of the URL endpoint. Make sure to read the documentation.
In Quickbase, the HTTP API Methods are set up to receive XML. The newer API Portal is set up to receive JSON.

Fig. 6
Step 7: Set Message Headers
Next, set your Message Headers. You will usually use the HTTP API Methods, API_AddRecord for example (See Fig. 7).

Fig. 7
Step 8: Enter the Message Body
Enter the Message Body. Remember that each tag in the XML must have a corresponding closing tag.
The starting parent tag is <qdbapi>.
You should include a security token (either user or app token depending on your app setup).
Next, include the fields on the record that you want to create or update. You can either use field IDs or names for this. You can either hard-code data within the tags for each field or supply dynamic values from the fields in the table where the webhook lives, placing the field name wrapped in brackets within the tag (See Fig. 8).
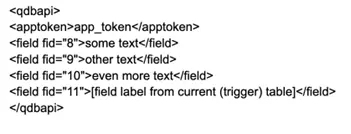
Fig. 8
Step 9: Save and Test the Webhook
Now, you are ready to save and test your webhook. After you click Save at the bottom of the webhook form, you will be taken to the list of Webhooks for that table.
Make sure the Active checkbox is checked (See Fig. 9). Then test the webhook by adding, modifying, or deleting a record (depending on the entry criteria you set up in step 3).
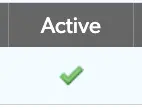
Fig. 9
Step 10: Check for Errors
If there are any errors, you will see an exclamation mark in a red circle by the name of your webhook (See Fig. 10).
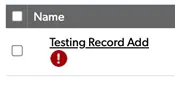
Fig. 10
If you see the error icon by the name of your webhook, you can find the details at the top of the webhook page next to the New Webhook button (See Fig. 11).

Fig. 11
Error messages are simply numeric error codes (See Fig. 12). Refer to the Quickbase Error Codes Guide for details on the error.

Fig. 12
That’s it.
Congratulations on making your first webhook!
- Author: Tom Shannon
- Email: tshannon@quandarycg.com
- Date Submitted: 11/14/2024

Resources


© 2026 Quandary Consulting Group. All Rights Reserved.
Privacy Policy