
Knowledge Base
How to Set Up Notifications in Quickbase | BEGINNER
There are numerous ways to use notifications in Quickbase.
For example, notifications need to be sent anytime a record gets added, changed, or deleted in Quickbase. You should also send notifications when clients add new tasks in the Issues Table or when a project is urgent.
By setting up notifications for these events, you will alert relevant teammates and keep everyone on your team in the loop. This will lead to more successful projects with fewer issues and faster completion time.
What Are Quickbase Notifications?
A Notification is an automatic email sent by Quickbase to let specific users know under specific conditions when a record in a given table is added, updated, or deleted.
There are two types of notifications in Quickbase:
- Recipient: Use this type of notification to send notifications to app users. You can create notifications based on user roles, showing only the fields and records they can access.
- Open: Open notifications send emails to people who do not have access to your app (done by typing in their email). The notification recipient can see all fields and information in the record(s). Only application managers can create this type of notification. You can control what fields display in an open notification by specifying a custom form or creating a custom notification.
- The notification recipient can see all fields and information in the record(s).
- Only application managers can create this type of notification.
- You can control what fields display in an open notification by specifying a custom form or creating a custom notification.

Note: A notification will not be sent when the owner no longer has access to the table or the app. The user may no longer have admin rights or have been removed from the app (for example, if the user has left your company).
When Not to Use Notifications
Do not use notifications when a user needs to be reminded or receive a consistent report. In those cases, you would use an automated Reminder or Subscription Email.
How to Set Up Record Change Notifications (Step-By-Step)
You can easily create record change notifications in Quickbase by following these steps.
Application Managers or users with Full Administration rights have more options than regular users of an application. Managers can send to multiple recipients, while users can only send to themselves.
Note: The steps in this procedure may be different if you do not have access permission to modify records.
Step 1: Choose between a General or a Personal notification (A or B).
A. General Notification: Open the table that contains the record that you want. Click Settings, click the New button above Notifications, subscriptions, & reminders, select Notification, and click Create.

B. Personal Notification: Select My personal settings in this app from the user dropdown on the Global bar. Click My email notifications, subscriptions & reminders, then click +New Email. Select Notification and click Create.
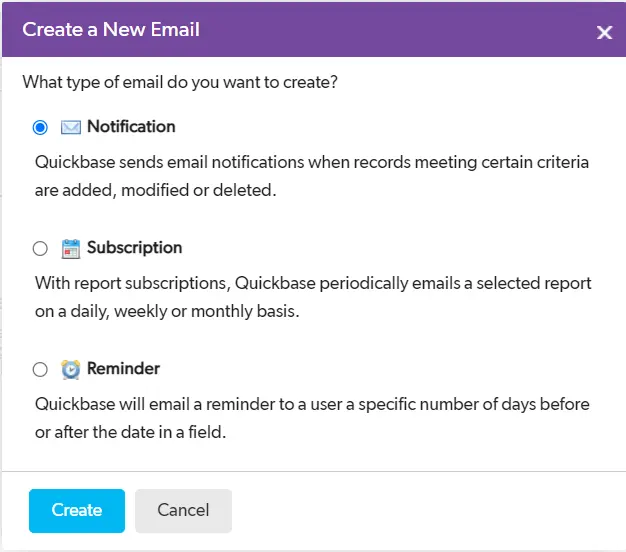
Step 2: Select a Permission Type from one of the following options:
- Recipient: Use this type of notification to notify users who participate in your application. Quickbase knows what you want these users to see based on the roles you assign each. This lets Quickbase construct each notification based on each individual's role, showing only those fields and records you granted them the right to see.
- Open: Use this option to notify someone who does not have access to your application (non-users).
Note: Do not use Open Notifications to send sensitive information because they can be sent to individuals who are not application users, potentially compromising security.

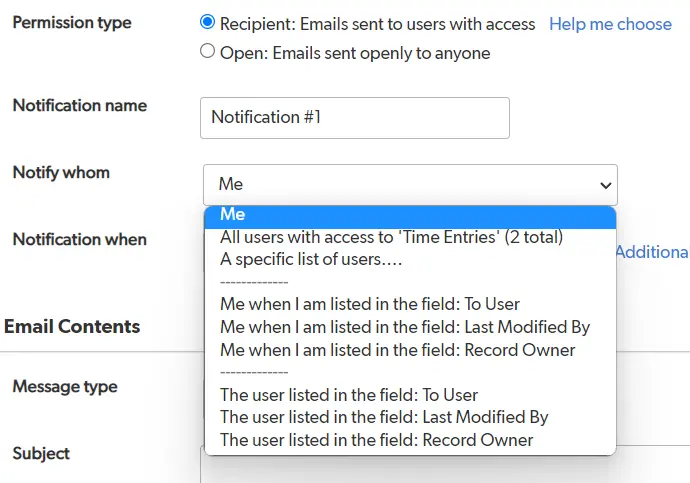
Step 3: In the Notification Name text box, enter a name for the notification.
Step 4: Select recipients from the Notify Whom list:
- Me: This will only send you the notification.
- All users with access to <table name>: This choice will notify all users with access to the table.
- A specific list of users: Use this option to choose a specific set of users or groups. Separate entries using a semi-colon, comma, or carriage return. Click the Browse Users button to select users with the User Picker. You can also send a one-time message out to all email addresses that appear in a table report.
Note: If you're creating a Recipient notification, the email entries must have access to your application.
- Me when I am listed in the field <name>: Quickbase lists a choice like this for each user field in the table. If you want Quickbase to send the notification only when you are the user listed in a specific user field, select this option.
- The user listed in the field <name>: Sends the notification to all users listed in a particular user or list-user field. For example, you can let team members know their assigned tasks have changed (or whatever record change(s) you choose in the next step). To do so, select the option for the Assigned to field.
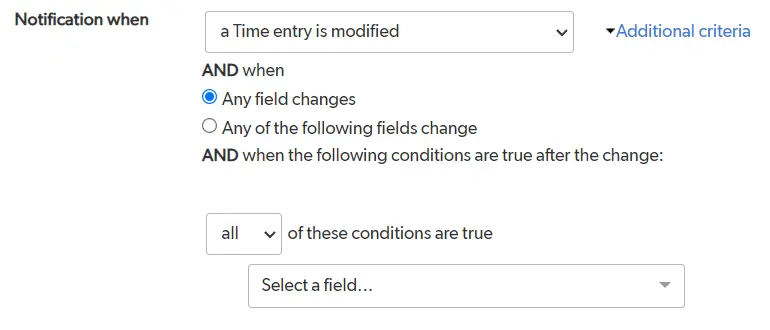
Step 5: In the Notify When box, select the actions that trigger a notification. You can send a notification whenever a record changes.
In addition to these "record changed" options, you can impose criteria users must meet to cause the notification. For example, you may only want a notification when someone modifies a task's Status field.
Step 6: Click the Additional Criteria arrow to the right of the Notify When box.
Step 7: Under AND when, select one of the following options:
- When any field changes: Send this email notification about changes to any field.
- When specific fields change: Opens a list of fields you can select and sends this email notification about changes made to the fields that you select from the list.
Step 8: You can create even more filer criteria under AND When the following conditions are true after the change.
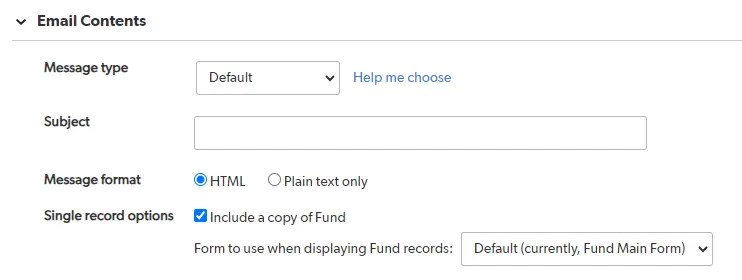
Step 9: Select one of the following message types from the Message Type list:
- Default: Generates a simple notification informing viewers who made the change, what it was, and where they can find it. It also includes some text explaining that Quickbase sent the email automatically. To see the default message, click Preview in the Page bar.
- Custom message: You compose the message yourself.
Note: If you include a file attachment field in the message and that field has been set to allow open access, the file is available to anyone who clicks the link in the notification email.

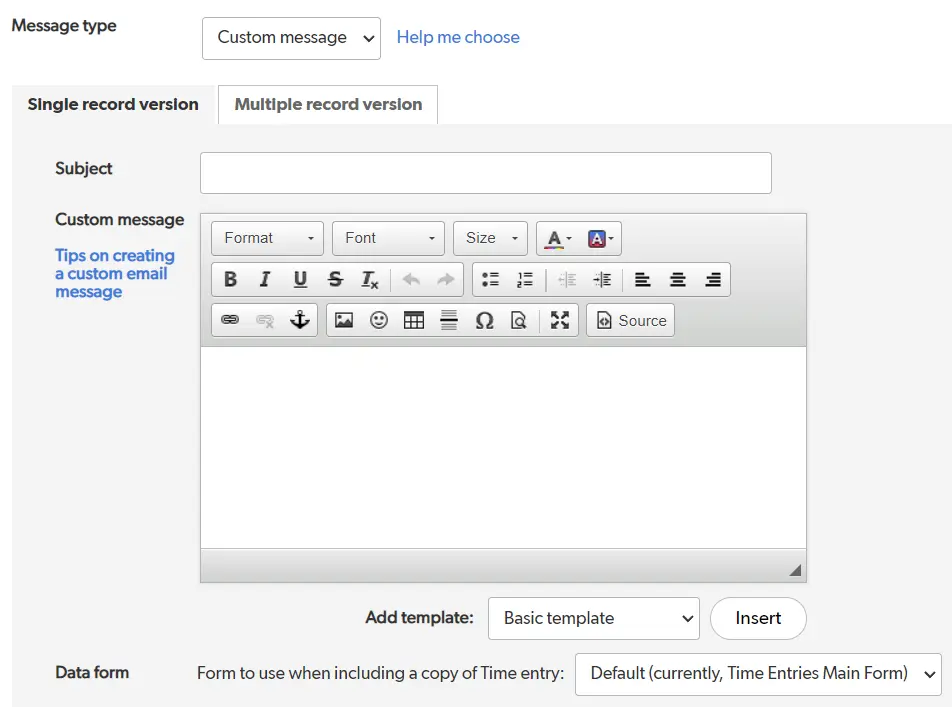
Step 10: If you want Quickbase to compose the subject line, leave the Subject field blank. Otherwise, type the subject of your email in the field.
A Fields and Markers list appears to the right of the box. You can insert field references and other information from your application into the subject line by selecting or searching for the field(s) you want.
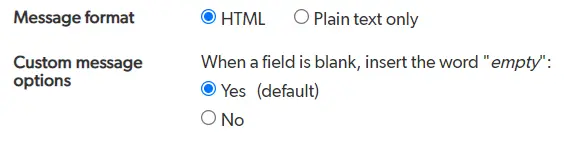
Step 11: Select one of the following options for the Message Format:
- HTML: Your messages appear in a specific font with special formatting, such as bold and italics. Most email programs can handle emails in HTML format.
- Plain Text Only: All email programs understand plain text format. If you're sure that most recipients use email programs that can't read HTML emails, select this option.
Note: Even if one of your recipients can only receive text-based emails, you can still select HTML because the format will change automatically. This is why you can see both modes when you preview the notification in HTML format.
Step 12: Tell Quickbase if you want it to include a copy of the record:
- If you select Default in Step 9, Quickbase will compose your notification message.
- Under the Single record options section, select the Include a copy of record checkbox to include a copy of the record in the message.
Note: If you include a copy of the record and the record has a file attachment field set to allow open access, the file is available to anyone who clicks the link in the notification email.
Step 13: Select a form from the Form to use when displaying the record dropdown to display the record in a custom data-entry form
Under Advanced Options, you can select additional optional settings.
Step 14: Choose when to send the notification under Operations.
Imagine that you do not want Quickbase to send out the notification when someone makes changes to many records in grid-edit mode (or the opposite). Maybe you want Quickbase to notify you only when several records change at once (for example, someone imports a large number of records). Whatever your preference, you would tell Quickbase what kind of edit or add operation will cause the notification under Operations.
Step 15: Set which email address the notification should be sent From:
- The application manager (your email address): this is the default setting.
- notify@quickbase.com: If Quickbase recognizes your company as the owner of its email domain, select application users from your company list. You can use this list to send an email to someone else. For example, your manager may be the public face of your application while you handle all management tasks, such as creating notifications. This user must be an individual who has access to your application. If you email someone else, they will receive an alert from Quickbase.
- The user listed in the field <name>: This option appears if you set up single-record operations to send notifications. Select a User field from the application so that Quickbase sends the email notification from the user in that field.
Note: Quickbase will only send the notification from this user if there is a value in the field for the record and the user listed there has access to the table and has the company’s domain in their email address. Otherwise, Quickbase will send the notification with the app manager's email address and send an email to the app manager notifying them that the email was sent out using their address.

Step 16: Click Preview on the Page bar to view a preview of your email, or click Save to save your changes.
Conclusion
When a table is updated with a new, modified, or deleted record and someone or a group needs to be aware of it, the Notifications feature in QuickBase is your solution.
- Author: Christin Shelton
- Email: cshelton@quandarycg.com
- Date Submitted: 9/24/2024

Resources


© 2026 Quandary Consulting Group. All Rights Reserved.
Privacy Policy