
Knowledge Base
Creating User-Friendly Forms in Quickbase | BEGINNER
Forms are used to add, edit, and view records. End-users interact most often with an app’s forms. That's why it's important to build user-friendly forms to help ensure an app's success.
To build a valuable, user-friendly form, the form must be easy for the user to navigate while capturing all the necessary data points.
You can create an easily navigatable form for users with tabs, sections, and Dynamic Form Rules.
To capture the necessary data points, the correct Fields must be created.
NAVIGATION
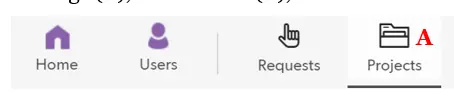
To customize a form from your app’s homepage, click on the table in the Table Bar (A),
Click Settings (B),
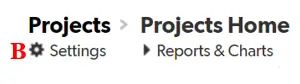
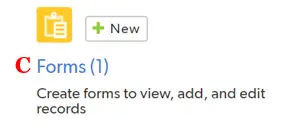
Click Forms (C),
Finally, select the Form you would like to edit.
USER-FRIENDLY FORMS
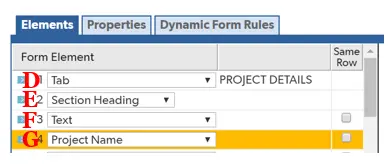
To create user-friendly forms, use the tools in the tabs of the Customize Form. We'll focus on the tools available in the Elements tab of the customize form page.
Form elements can be tabs (D), section headings (E), text (F), field (G), and child table reports (report link fields).
✓ Tabs: a powerful tool to break up long forms and to hide fields from different roles.
For instance: a customer record may have multiple locations, contacts, invoices, etc. All this information can be stored in one tab. However, to make it easy to find the information, it would be better to create a tab for locations, contacts, invoices, etc. Additionally, you may want to prevent some roles from being in one or more tabs. This can be configured in the Dynamic Form Rules tab.

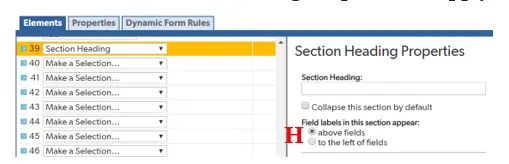
✓ Section Headings: like tabs, section headings can be used to break up forms and make them more user-friendly. They also can be shown/hidden based on different dynamic form rules.
As a best practice, field labels should appear above fields. Click the radio button in the Section Heading Properties to apply (H).
✓ Text: should be added to give additional instructions to users if necessary.
✓ Fields: capture all the necessary data.
In the form, fields will display their name as the default. Occasionally, it makes sense to shorten it to make the form easier to navigate (i.e. ‘Project Name’ could be shortened to ‘Name’ if the field is below a ‘Project’ Section heading).
To change the field name that is displayed on the form, click the ‘Use Alternate Label Text’ and enter the desired text to display on the form (I). By default, there is only one field per line.
However, it makes sense to put some fields on the same line to save space and make the form more user-friendly when building longer forms. Simply click the "Same Row" checkbox next to the form element that needs to be placed on the same row as the previous form element(J).

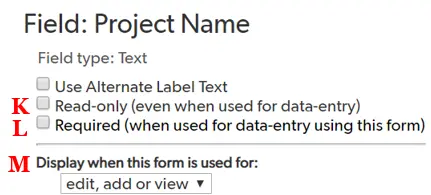
Furthermore, fields can be made read-only (K) or required (L) by clicking the radio buttons:
- Read-only will not allow a user to edit the field
- Required will make the user input data into the field before saving the record
As a default, fields are shown when a record is being edited, added, or viewed. However, you can customize that functionality to any combination by clicking the drop-down (M).
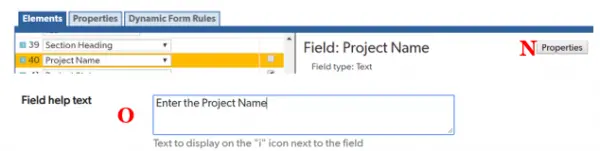
✓ Information Icon: provide additional instructions for any given field.
Occasionally, it may not be self-intuitive what should be entered in a field. Instead of using the alternative label text and having a long field name, you can create an information icon that can include more direction for the user on what should be entered in a field.
To create the information icon, select the field you want the icon to display next to in the form. Next, click ‘Properties’ (N) and scroll to the bottom of the pop-up window.
At the bottom, there is a field called “Field help text”; enter the message you would like to display to a user when they hover their mouse over the icon (O).
✓ Child Table Reports (report link fields): can provide valuable information to the user when looking at a parent record.
It allows the user to see all pertinent information in one form. As a best practice, the child report should be under its own section heading or on its own tab.
Dynamic form rules are a great place to start when building user-friendly forms. If you want to learn more about dynamic form rules, check out the article, Creating Form Rules.
- Author: TJ Lawless
- Email: tlawless@quandarycg.com
- Date Submitted: 1/3/2018

Resources


© 2026 Quandary Consulting Group. All Rights Reserved.
Privacy Policy