
Knowledge Base
How to Use Quickbase Pipelines to Elevate Your Notifications | INTERMEDIATE to ADVANCED
Why Is It Better, How to Use, and Use Cases to Demonstrate
Most of the time, native notifications in Quickbase are sufficient for your application. However, if you find yourself limited and stuck with a notification you have options in Pipelines.
With Pipelines, you can centralize your notifications into one table. Schedule reminders outside of the normal cadence. And even let end users control their own settings.
I’m going to show you how to transform these notifications into Pipelines that create a more immersive experience and a more effective notification for your Quickbase Application.
The Limitations of Quickbase Notifications
Quickbase notifications are great for performing the most functionalities in Quickbase Apps. However, there are limitations:
- Who gets notified: Administrators are limited to what notifications end users can receive. Notifications are permission-based and limited to users with set permissions within Quickbase. For Example, Reports are limited to internal QB Users.
- When you receive notifications: With native notifications, you can only receive alerts during specific daily, weekly, or monthly cadences.
- Reliability: There is no way of knowing if a notification is sent properly without extensive testing. In Pipelines, you can review if the process was complete.
These are all limitations I’ve encountered that affect how you can use native notifications. If any of these cause a problem, you need to find a workaround or risk not delivering the notification.
Alternatively, you can avoid all of these issues by using Pipelines for notifications.
Overcome These Limitations With Pipelines
Set Up a Customized Notification Cadence
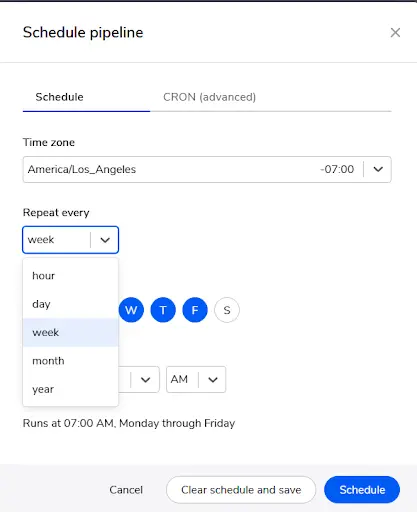
You can use CRON expressions or the typical Schedule UI (pictured below) to schedule a pipeline to run on a unique cadence. You can set it to receive notifications in a specific hour, day, week, month, year, or even time zone.
This is especially beneficial for end users who do not work in the Quickbase native notification’s automatic Pacific Standard Time zone.
Using CRON expressions can further expand these capabilities by allowing users to run pipelines on a specific day of the year (say every 3rd Friday of the Fiscal Quarter at 3:20 am).
Send Notifications to Everyone
In a native notification, you can only send notifications to users inside Quickbase with set permissions. In pipelines, however, you can send notifications to anyone and can actually build out a list of email recipients.
You can do this by hardcoding an email into the pipeline or through a generated email list in Quickbase. This provides access to the information inside of Quickbase that outside users wouldn’t have without necessarily adding them to the app.
For example, if you need new Quickbase users to sign an NDA or contract, you can send them an email notifying them before they are able to sign into Quickbase.
Adjust Conditionals
When setting up a notification pipeline, you can easily set up your conditionals. Similar to cadence, conditional settings do exist inside the feature of custom email notifications. However, there are limitations in email structure, content or reports, and recipient.
Conditionals are set up easily using the search action inside of quickbase pipelines, utilizing the filters and specific criteria to trigger on. The advantage here is the ability to maximize all tools inside of quickbase pipelines to adjust your notification to your liking, even going as far as using the Jinja, the pipelines language, to manipulate your data into a structured table.
Ensure the Notifications Work
One of the most overlooked benefits of Pipelines is the ability to use notification to notify you when your pipelines work properly. While there is a “Send Test Email” button in the native notifications UI, if anything goes wrong, you cannot pinpoint where the issue started. You will only see the email not sent.
This can be frustrating and time-consuming for the developer.
Inside Pipelines, you can easily read the activity log and make changes to fix any problems.
Note: When using pipelines to create notifications, you need an integrated email service, such as Gmail or Outlook. Setting up a connection is similar to any other integrated service.
General Structure of a Pipeline Notification
Let’s break down the general structure of what a notification will look like in a pipeline. Here are a couple of ways you can use this in your application.
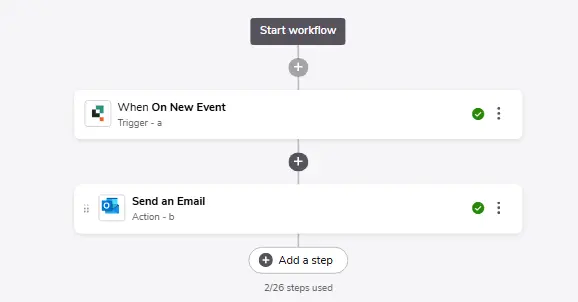
First, decide what will trigger your notifications. This can be a scheduled pipeline or an event change. For an event change, you can simply include the email action after the event occurs. And then from there you can modify the email action and include necessary criteria.
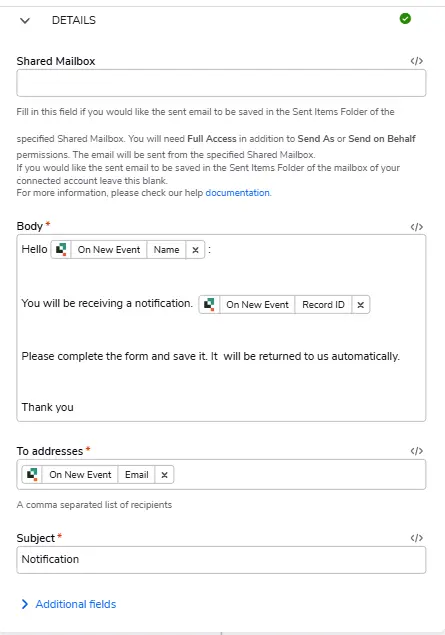
Here you can develop the body of an email, set the recipients, and decide whether to CC or BCC anyone.
Additionally, you can include the importance of the email and save a copy in the Quickbase app for record keeping. Inside the body, you can drag and drop as many fields as you’d like without needing to format them. You can also add links to tables if you want to show more information.
Using the Make Request Action for Unique Subscriptions
What if you want to develop a subscription to a notification without a specific schedule in mind?
In this case, you need to approach the pipeline slightly differently. There are two ways to accomplish this. I will show the most advanced method I have used.
This method requires setting up and knowing how to use the Make Request action. Once you have all the pieces together, it isn’t as complicated as it seems.
- Use the search records function to start the pipeline. You need to identify your conditions so you can pull out specific records that meet your criteria. A thing to note, the criteria here **Need to match **the filters in the report that you are going to be pulling data from.
- If there are no records, you can make the pipeline stop to prevent sending out a blank report.
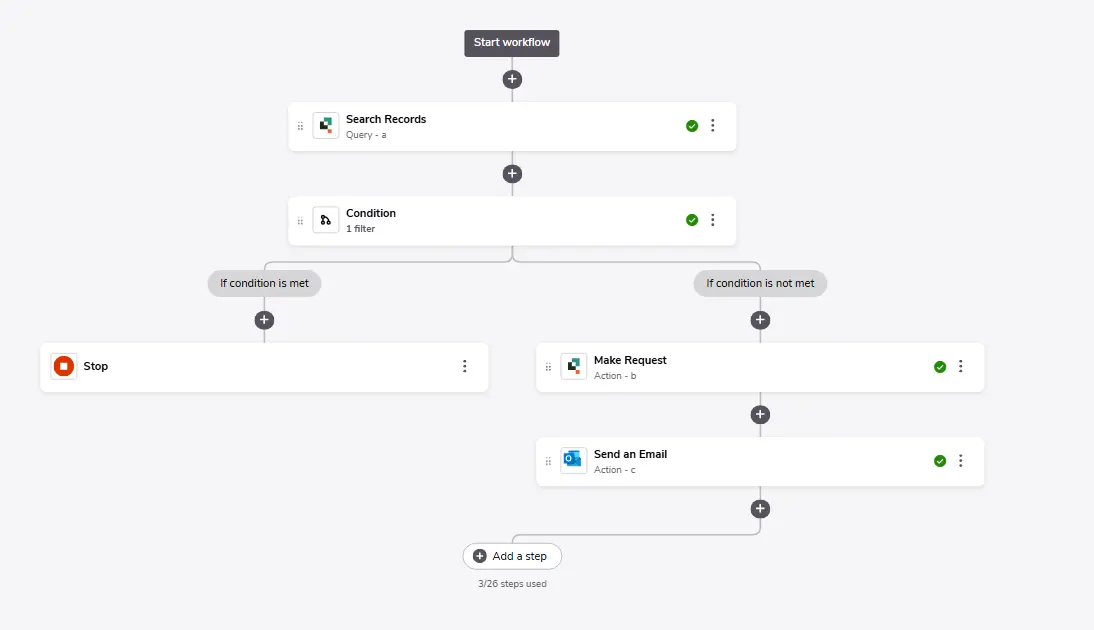
- Otherwise, set the pipeline logic flow to where you have records in your criteria. Then, develop your notification. (See an example of a specific flow in the image below.)
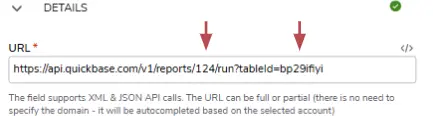
- Next, we use the Make Request action. You only need to do this if you want to build a specific report without using an existing table report in Quickbase.
- Inside Make Request, you need to pull the Table ID and the specific report. (In this example below, I’m pulling the report ID ‘124’ and the table ID ‘bp29ifiyi’.)
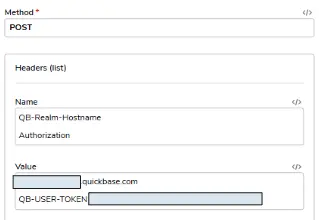
- Next, you will set up the API Authorization. This requires a Quickbase User Token (found in My Personal Settings). The typical method is POST. And you need to identify the application and User Token in the Value field. You can simply copy what is here and replace the value field with your own Quickbase realm/app and User Token.
Note: Under additional fields, the content type will be application/json for this example.
- Now that you retrieved the data from the search parameters, you need to develop a unique table using Jinja. This will be inside of the Send Email Action. (You need to link your email client. In my example, I’m using Outlook).
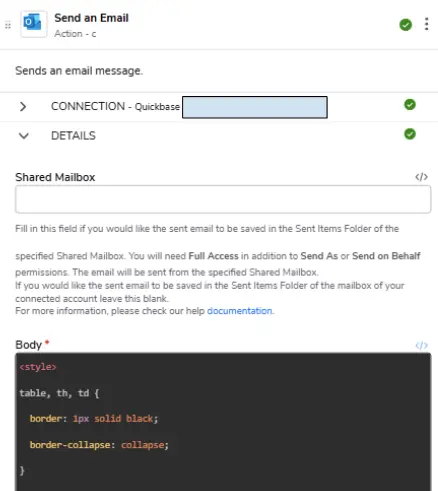
- Inside the Body, I’m going to use this code snippet pictured below. This creates a table of data we pulled from our Make Request Action and only pulls the data values. As a result, it removes all Quickbase formatting and presents it in a very simple table format. (Feel free to copy this for your own efforts.)
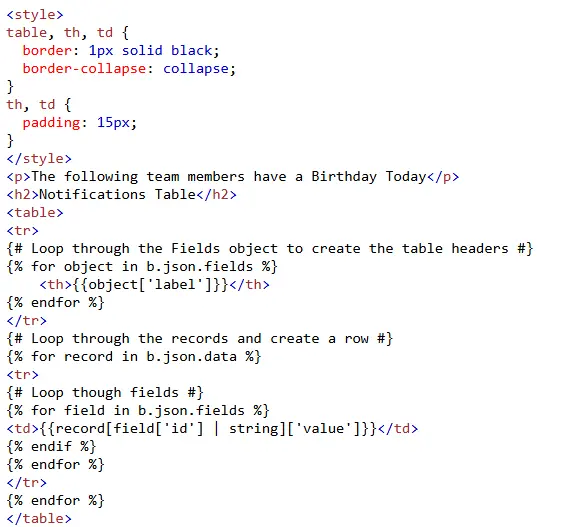
One that looks like this.
NameEmailJoe Smithemail@outlook.com
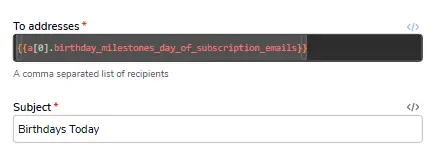
- Once the body of the email is completed, you can now select and choose the emails you wish to send. This can be a bit tricky as the logic needs to be correct. The emails can be hardcoded in. You can also utilize an email list or a specific email field. (I’m using an email list here for my example.)
- By using the search action in the pipeline, this has generated an array of data. Therefore, you must decide what part of the array you would like to use. In the example below, I selected the first value notated by brackets [0]. And to translate this value into jinja, the user must insert the brackets between the periods. {{a.[0].birthday_milestones……}}.
This is how we create and set notifications.
In conclusion, this is a very effective way of sending data outside the Quickbase Realm of users, and in a way that is readable through a table format.
Specific Use Case: User Notifications Table
Now that I have shown you how to set up a general pipeline notification, I will show you a creative way to bring extra functionality to your Quickbase application.
Say the users in your Quickbase application want to control their own notifications and receive only relevant notifications. You can do this through a few formula queries and a connected table.
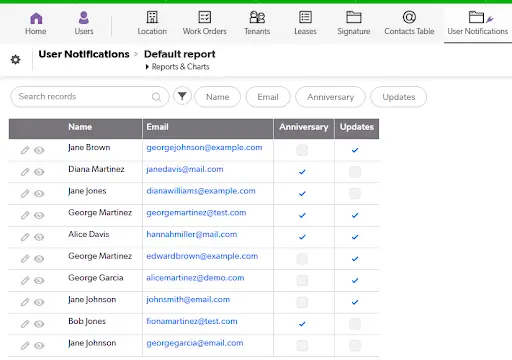
- The first thing we must have in the system is a table of contacts with names and emails. This is in addition to the already built in Users Table. So let’s create a brand new contacts table and connect it through a table-to-table connection that pulls those specific fields into the new table. This table will have additional fields for checkboxes that allow the system users to turn on/off.
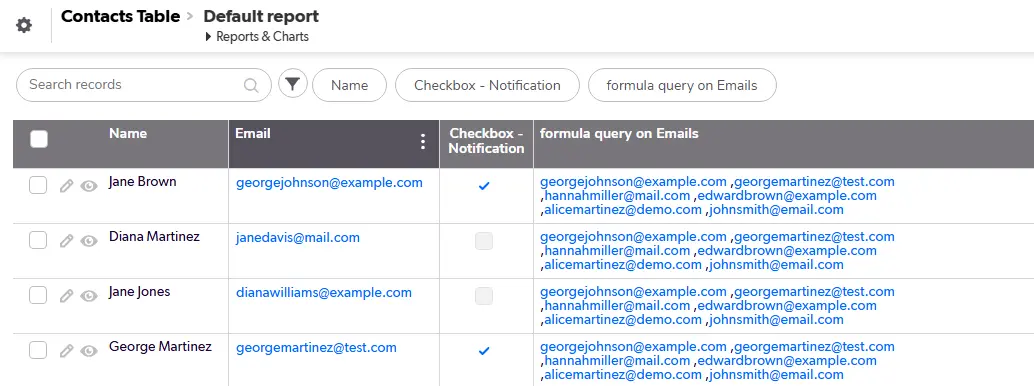
- Now we are going to go over to the Contacts Table and set up two fields: A formula query checkbox and a formula query list.
- The checkbox notification will have a query like that shown here. With this, we can view if the user is indeed to receive the email notification. Now that we have the checkbox, we are going to set up the list of people.

- This will be our formula query for our email list, where we retrieve all emails that have a checkbox associated with them.

- Now that we have our list, we can insert it into our notifications in our pipelines in the above field of “To Addresses” in Step 10 of setting up a Notification.
- Now you have the tools to allow your end users more flexibility for notifications inside of Quickbase. This is the end result of our queries.
- Author: Logan Lott
- Email: llott@quandarycg.com
- Date Submitted: 8/7/2024

Resources


© 2026 Quandary Consulting Group. All Rights Reserved.
Privacy Policy