
Knowledge Base
How to Turn Quickbase Webhooks into Pipelines | ADVANCED
Quickbase Webhooks was meant to automate processes almost instantaneously. As webhooks gradually become uncertain, the best option is to transition them into Pipelines to retain your automations.
With Quickbase Pipelines, the use case for webhooks is no longer valid. Instead, pipelines allow the user to run with a more low-code approach. This allows for more integrations, connections, and versatility. Pipelines also provide insight into issues, possible inefficiencies, and immediate error resolution.
Additionally, they allow the user to schedule and trigger more items (where webhooks could not). With that being said, systems can bog pipelines down during high peak times and when multiple processes run at the same time. There may also be delays with Pipelines at the beginning as they may not fire immediately, unlike a webhook.
Pipelines can work in tandem with Webhooks through the Webhooks Channel using the Make Request Action.
Note: the biggest challenge is converting webhooks syntax to pipeline syntax.
Explaining Quickbase Webhook Syntax
There are differences between Quickbase Webhook and Pipeline syntax you should know.
Webhook Syntax is built around the fields and forms inside the Quickbase Tables, while Pipeline Syntax is built inside the Pipeline. Knowing this difference helps you conceptualize how to formulate the pipeline to accommodate the webhook, starting with the trigger.
When converting from a webhook syntax to pipeline syntax, the webhook syntax is similar to what you may see in a formula field for example [Record ID#] or [Title]. These are defined by the straight brackets [].
The value changes with pipelines. Instead, you will utilize where the value is pulled from in each step of the pipeline process. For example, step A, {{a.id}} or {{a.title}}. There’s a slight difference as it is defined by curly brackets {{}}.
Values inside a webhook, like a field ID number, are defined as numbers. However, you need to surround this number with apostrophes for this to work inside a pipeline. For example, when you use the mergefieldid in the webhook payload, you need to surround it with apostrophes.
You will see examples of this below.
The Current Webhook Layout
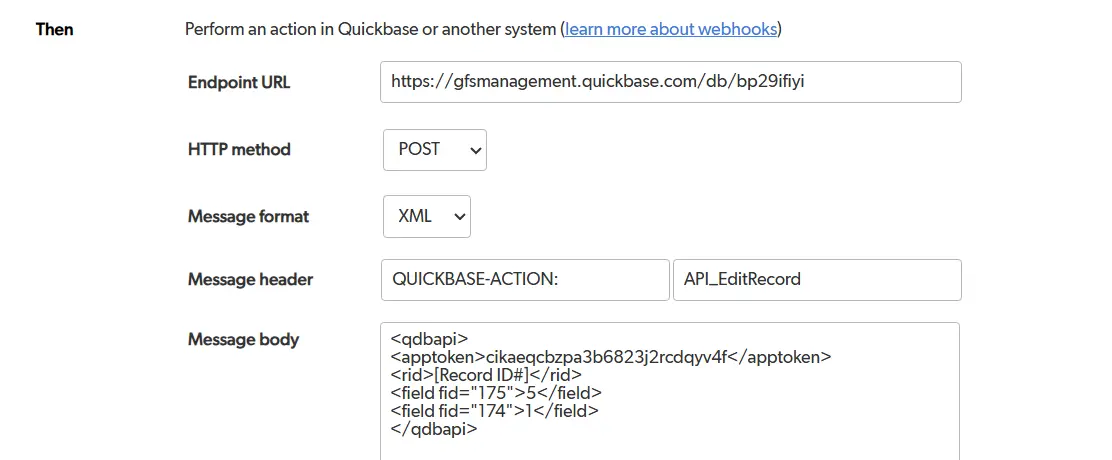
The current webhook layout consists of trigger fields, conditionals, and webhook payload.
A: Trigger Fields
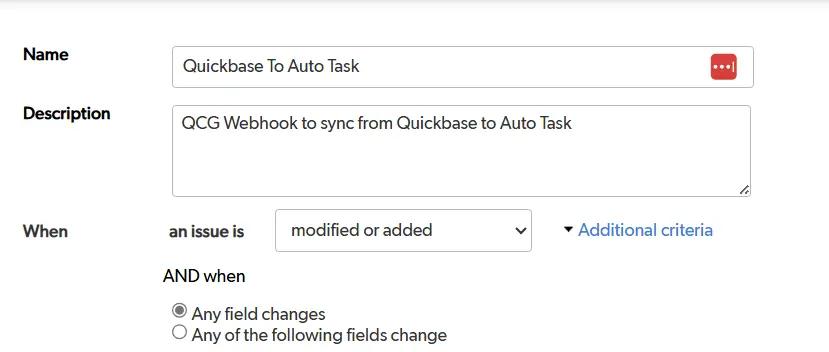
B: Conditionals:

C: Payload
How to Convert Webhooks to Pipelines
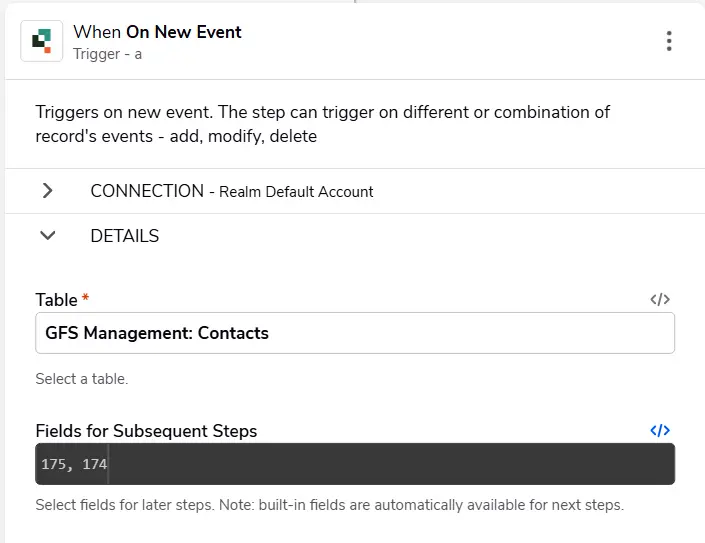
1. Set the Pipeline Trigger
You will need a new event to convert a webhook into a pipeline. This is where the developer needs to identify how the field is triggered:
- On Modified
- On Delete
- On Add
Once you identify and choose the correct trigger, the best approach is to maintain the field ids from the webhook. This will expedite the process of setting up the pipeline.
It’s best to utilize the, less than – slash – greater than, .
You can find this in the upper right corner of the field selector.
Note: Some fields that could be triggered in a webhook, may not be triggered in a pipeline. This is something you may need to test out, like a formula field that won’t trigger a pipeline. This could be a reason why your converted webhook pipeline is not working.
2. Set Pipeline Conditionals
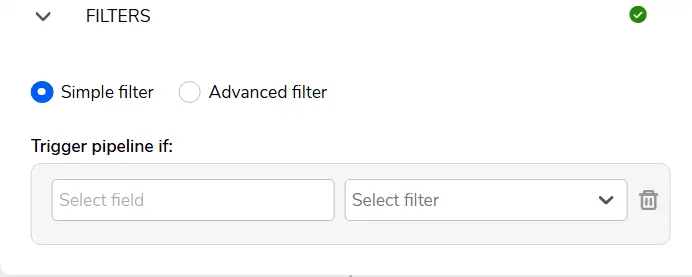
The filter at the bottom of the trigger is the conditional. You need to align the conditionals with the conditionals in the pipelines.
3. Making a HTTP Request in a Pipeline
We will use the Make Request channel inside of pipelines to perform the action of the webhook.
We can choose HTTP Basic for Authentication and leave the other fields blank. (This won’t be necessary unless working outside of Quickbase.)
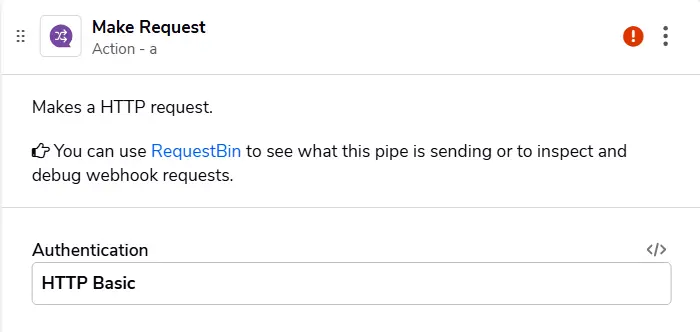
The URL where the data action is GET, POST, PUT, DELETE, HEAD, OPTIONS, or PATCH will be identified in the webhook, which flows into our next Method field. Additionally, you should define the content type (For example, whether the Payload will be XML, JSON, or URL_Encoded). You should note all of this inside the webhook payload, as shown above in C: Payload.
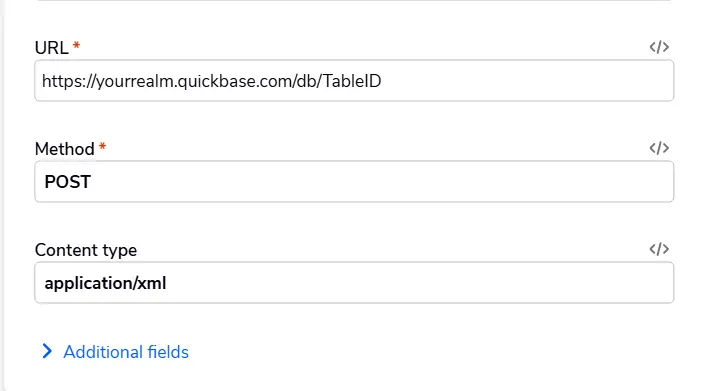
4. Set Up Payload (Optional)
Note: This is optional. However, you will likely use this as part of the Webhook setup as it is where you will use the API tools.
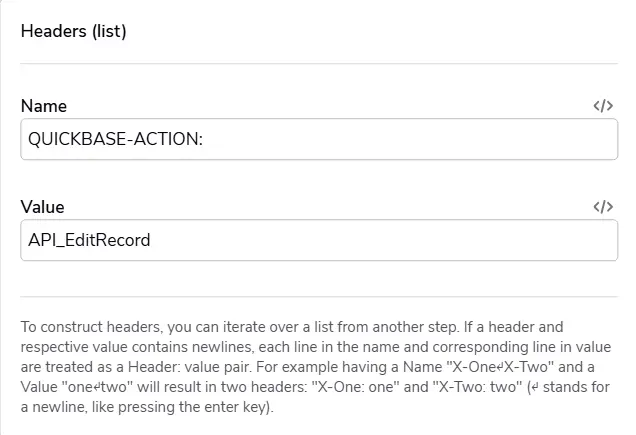
The Body contains the Webhook Payload.
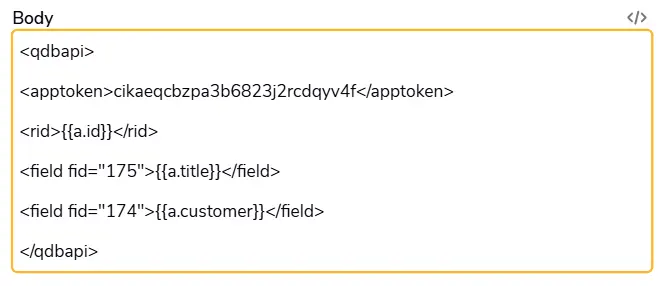
This will be a copy and paste. However, you will need adjustments to translate it into Pipeline Syntax. You need to convert the identified record id and field ids now.
This is the original webhook payload vs. the new updated payload. You can see clearly the changes:
Webhook Payload:

Pipeline Payload:
Most Common Use Cases for Pipelines
API_EditRecord / API_AddRecord / API_PurgeRecords
Trying to convert an edit/modify webhook is more trouble than it’s worth. The best option is to convert it entirely into a pipeline. This function is more difficult to implement. Instead, it's best to use normal pipeline functionality (for example, Search and Update Records).
You should only utilize the webhook as an absolute if you can’t change the existing API or if the pipeline can’t create the new record.
Webhook triggered on Event and Add/Modify/Delete a Record:
- Option 1: Turn webhook into a pipeline using a Quickbase Action: Create Record, Update Record, Delete Record
- Option 2: Keep webhook and utilize the Make Request action
ImportfromCSV –
In this instance, keep the webhook and Utilize the Make Request action.
Common issues:
- Not pulling necessary fields for subsequent steps in the webhook
- Not having a user token
- Trying to Use API_AddRecord when creating a record does the same.
- Creating records in the same table (and other tables) Complicates the process when using API_
- Incorrect Syntax for Body Webhook:
- mergefieldID is an integer field that must be separated by apostrophes ‘26’
- The payload can be based on the 12.231.3. format syntax in the webhook, which separates the values where no further actions are needed (for example, buckets or prepare bulk upsert).
- Not removing or turning off %repeaton% and %repeatoff% internal functions that one would see in a webhook. This may lead to duplicate dummy records
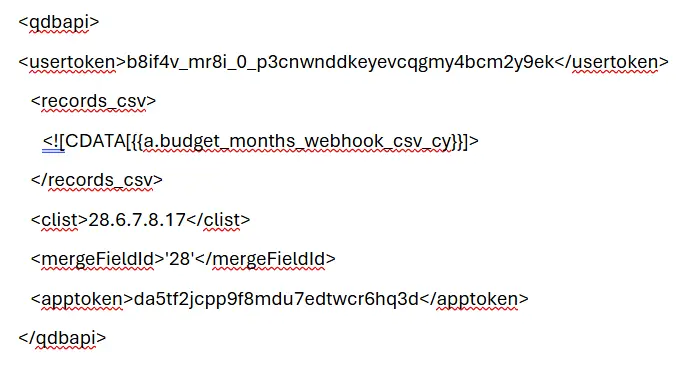
Example of ImportfromCSV
This commonly used webhook is easily adaptable in the pipeline. You can keep the field ids the same, separated by a period. You only need to change the MergefieldID with quotes.
- Author: Logan Lott
- Email: llott@quandarycg.com
- Date Submitted: 6/19/2024
Resources
© 2026 Quandary Consulting Group. All Rights Reserved.
Privacy Policy


