
Knowledge Base
Articles In This Section
How to Use Custom HTML as a Form Element in Quickbase How to Create Quickbase Form RulesHow to Use Grid Edit in QuickbaseHow to Customize Radio Button Properties in QuickbaseSections
How to Create User-Friendly Forms in Quickbase
Forms are used to add, edit, and view records. End-users interact most often with an app’s forms. That's why it's important to build user-friendly forms to help ensure an app's success.
To build a valuable, user-friendly form, the form must be easy for the user to navigate while capturing all the necessary data points.
You can create an easily navigation form for users with tabs, sections, and Dynamic Form Rules. To capture the necessary data points, the correct Fields must be created.
Adding Navigation to Quickbase Forms
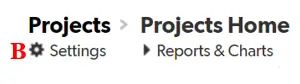
To customize a form from your app’s homepage, click on the table in the Table Bar (A),

Click Settings (B),
Click Forms (C),
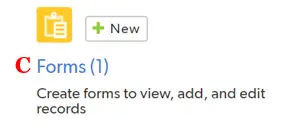
Finally, select the Form you would like to edit.
Creating Quickbase User-Friendly Forms
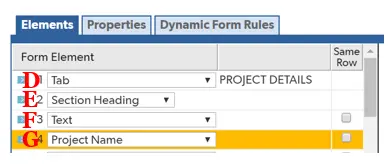
To create user-friendly forms, use the tools in the tabs of the Customize Form. We'll focus on the tools available in the Elements tab of the customize form page.
Form elements can be tabs (D), section headings (E), text (F), field (G), and child table reports (report link fields).
Quickbase Tabs
Quickbase Tabs are a powerful tool to break up long forms and to hide fields from different roles.
For instance: a customer record may have multiple locations, contacts, invoices, etc. All this information can be stored in one tab. However, to make it easy to find the information, it would be better to create a tab for locations, contacts, invoices, etc.
Additionally, you may want to prevent some roles from being in one or more tabs. This can be configured in the Dynamic Form Rules tab.

Quickbase Section Headings
Section Headings - like Quickbase tabs - can be used to break up forms and make them more user-friendly. They also can be shown/hidden based on different dynamic form rules.
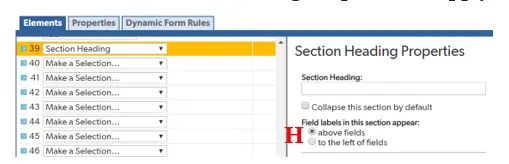
As a best practice, field labels should appear above fields. Click the radio button in the Section Heading Properties to apply (H).
Quickbase Fields
Quickbase Fields capture all the necessary data. In the form, fields will display their name as the default. Occasionally, it makes sense to shorten it to make the form easier to navigate (i.e. ‘Project Name’ could be shortened to ‘Name’ if the field is below a ‘Project’ Section heading).
- To change the field name that is displayed on the form, click the ‘Use Alternate Label Text’ and enter the desired text to display on the form (I). By default, there is only one field per line.
However, it makes sense to put some fields on the same line to save space and make the form more user-friendly when building longer forms. Simply click the "Same Row" checkbox next to the form element that needs to be placed on the same row as the previous form element(J).

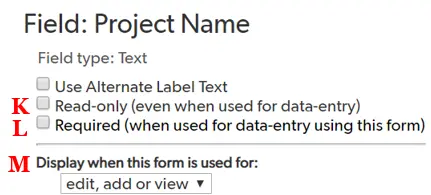
Furthermore, fields can be made read-only (K) or required (L) by clicking the radio buttons:
- Read-only will not allow a user to edit the field
- Required will make the user input data into the field before saving the record
As a default, fields are shown when a record is being edited, added, or viewed. However, you can customize that functionality to any combination by clicking the drop-down (M).
Occasionally, it may not be self-intuitive what should be entered in a field. Instead of using the alternative label text and having a long field name, you can create an information icon that can include more direction for the user on what should be entered in a field.
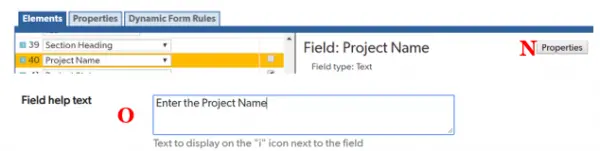
To create the information icon, select the field you want the icon to display next to in the form. Next, click ‘Properties’ (N) and scroll to the bottom of the pop-up window.
At the bottom, there is a field called “Field help text”; enter the message you would like to display to a user when they hover their mouse over the icon (O).
Child Table Reports (report link fields):
Child Table Reports can provide valuable information to the user when looking at a parent record.
It allows the user to see all pertinent information in one form. As a best practice, the child report should be under its own section heading or on its own tab.
Dynamic form rules are a great place to start when building user-friendly forms. If you want to learn more about dynamic form rules, check out the article, Creating Form Rules.
- Author: April Barragan
- Title: Solution Consultant | Quickbase
- Email: abarragan@quandarycg.com
- Date Updated: June 28, 2026
Top FAQs about Creating User-Friendly Forms in Quickbase
1. What is a Quickbase form?
A Quickbase form is the interface users interact with to create, edit, and view records within an application. Forms organize fields into a logical layout, making it easier for users to enter accurate information. Well-designed forms improve productivity, reduce data entry errors, and provide a better overall user experience by displaying only the information users need.
2. How do I create a custom form in Quickbase?
To create a custom form in Quickbase:
- Open your application.
- Navigate to the desired table.
- Select Settings.
- Choose Forms.
- Click New Form or edit an existing form.
- Drag and drop fields into the desired layout.
- Organize fields into sections or tabs.
- Save and publish the form.
You can create multiple forms for different user roles or business processes.
3. What makes a Quickbase form user-friendly?
A user-friendly Quickbase form is simple, organized, and intuitive. Best practices include:
- Display only fields users actually need.
- Group related information into logical sections.
- Use descriptive field labels.
- Place required fields near the top.
- Minimize scrolling.
- Use conditional rules to hide unnecessary fields.
- Keep layouts clean and uncluttered.
- Display instructions where needed.
A streamlined form helps users complete tasks more quickly while improving data quality.
4. How do I organize fields on a Quickbase form?
Fields should be grouped according to the workflow rather than their creation order. For example:
- General Information
- Customer Details
- Project Information
- Financial Details
- Status & Approvals
- Attachments
- Notes
Using section headers, columns, and tabs makes forms easier to navigate, especially when they contain many fields.
5. Can I show or hide fields based on user input?
Yes. Quickbase supports dynamic form rules that allow fields to appear, disappear, become required, or become read-only based on user selections. For example:
- Display shipping fields only when "Physical Product" is selected.
- Show approval information only when a project reaches the Review stage.
- Require additional documentation when a request exceeds a certain dollar amount.
Dynamic forms reduce clutter while ensuring users only complete relevant information.
6. Can I create different forms for different users?
Yes. Quickbase allows multiple forms within the same table. Different forms can be assigned based on:
- User roles
- Business departments
- Workflow stages
- Record types
- Specific use cases
For example, managers may see approval fields while employees only see data entry fields.
7. How do required fields improve Quickbase forms?
Required fields help ensure important information is captured before a record can be saved.
Examples include:
- Customer Name
- Project Status
- Due Date
- Assigned Employee
- Purchase Amount
Using required fields improves reporting accuracy and reduces incomplete records.
8. Can I embed reports or related records inside a Quickbase form?
Yes. Quickbase allows reports, child tables, and related records to be embedded directly within forms.
Examples include:
- Project Tasks
- Purchase Order Line Items
- Customer Contacts
- Invoice Details
- Equipment Maintenance Records
Enabling editable embedded reports allows users to update related records without leaving the parent form, improving efficiency and reducing navigation.
9. How can I reduce data entry errors in Quickbase forms?
Several features help improve data accuracy:
- Required fields
- Drop-down lists
- Multiple-choice fields
- Lookup fields
- Dynamic form rules
- Validation rules
- Field help text
- Default values
- Conditional requirements
These features guide users toward entering consistent, high-quality data while reducing manual mistakes.
10. What are the best practices for designing Quickbase forms?
To create forms users enjoy working with:
- Keep forms as simple as possible.
- Display only necessary fields.
- Organize information logically.
- Use section headers and tabs.
- Minimize scrolling.
- Leverage dynamic form rules.
- Use embedded reports when appropriate.
- Clearly label every field.
- Test forms with real users before deployment.
- Continuously refine forms based on user feedback.
Well-designed forms improve adoption, increase efficiency, and help organizations maintain accurate, reliable business data.

Industries
Resources


© 2026 Quandary Consulting Group. All Rights Reserved.
Privacy Policy